


DIY Bike Trailer 101
 10-13-06, 08:35 PM
#1

In the right lane
Thread Starter

DIY Bike Trailer 101
I've been interested in getting a bike trailer to reduce the number of times I have to ride to the grocery store. I know you can sometimes pick up an older Burley for a reasonable price. But when I looked on my local Craigslist, the cheapest was $160.
So I started searching the Internet for some do-it-yourself designs. There are a lot of wacky design out there, but I found one created by a guy from Ottawa named Mark Rehder at https://drumbent.com/trailer.html ....which looked pretty good.
The gist of the story is that this is a bolted together frame using EMT conduit and 4"x4" conduit covers as the dropouts for the wheel axle. For about $22 in materials, maybe another $18 for a good trailer hitch (https://www.tinyride.com/%20Chariot-E...&kwd=20100709), some old wheels I had and a Rubbermaid box I already have too, I could put together a pretty nice trailer.
Last week I got the conduit and rented a manual bender for $9 and started bending the stuff. Everything didn't go too perfectly, but conduit bending isn't rocket science either.
My problem is that the design calls for me to drill some holes through the 3/4 inch conduit. Right now, I'm hoping I can purchase a vise and punch to get the conduit scored so the drill bit isn't wandering all over the place.
Another problem is that the vertical dropouts require me to bend the the electrical plate cover around the conduit. The instructions claim I should be able to do this by hand. However, I'm lost here. This plate is 3/16" thick and doesn't bend easily.
The instructions are pretty clear, but I'm just a bit lost on these two points. Does anyone have any takes on this design or these problems?
 10-14-06, 07:56 AM
#2

Humvee of bikes =Worksman

Join Date: May 2004
Posts: 5,362
Mentioned: 0 Post(s)
Tagged: 0 Thread(s)
Quoted: 10 Post(s)
Likes: 0
Liked 6 Times
in
6 Posts
Assuming that you bent all the tubing correctly consider brazing/welding
in place of bolts. Spend the vise money to get the brazing/welding done.
Why?
Bolting like this trailer calls for is OK but brazing/welding makes it MUCH
stronger. Bolts will work loose in time where brazing/welding is a done
deal.
in place of bolts. Spend the vise money to get the brazing/welding done.
Why?
Bolting like this trailer calls for is OK but brazing/welding makes it MUCH
stronger. Bolts will work loose in time where brazing/welding is a done
deal.
__________________
My preferred bicycle brand is.......WORKSMAN CYCLES
I dislike clipless pedals on any city bike since I feel they are unsafe.
Originally Posted by krazygluon
Steel: nearly a thousand years of metallurgical development
Aluminum: barely a hundred, which one would you rather have under your butt at 30mph?
10-14-06, 09:07 AM
#3

Destroyer of Wheels

Originally Posted by gerv
My problem is that the design calls for me to drill some holes through the 3/4 inch conduit. Right now, I'm hoping I can purchase a vise and punch to get the conduit scored so the drill bit isn't wandering all over the place.
While welding would be stronger screwing it together should be fine. I once fixed my old pickup truck bed cover using conduit, drilling through it and through the top. Worked great and seemed stronger than the old aluminum braces.
It won't last you long enough to pass down to your grandchildren, but the conduit will rust pretty quickly anyway since it's cheap and thin steel.
Looks like a fun project! Did it say how much weight it could carry? Doesn't look like much more than 50 pounds or so...
Post plenty of pictures when you're done!
__________________
The Almighty Clyde FAQ || Northeast Index
eTrex Vista References || Road Reference
It's the year of the enema!
The Almighty Clyde FAQ || Northeast Index
eTrex Vista References || Road Reference
It's the year of the enema!
10-14-06, 09:18 AM
#4
Junior Member
Join Date: Sep 2006
Posts: 18
Mentioned: 0 Post(s)
Tagged: 0 Thread(s)
Quoted: 0 Post(s)
Likes: 0
Liked 0 Times
in
0 Posts
I can suggest a method of bending the plates, but it will require a solidly mounted bench vise. Go to the plubming section and get a piece of black pipe the same outside diameter as the EMT. Put the plate and the pile into the vise, and use a BFH (big hammer) to bend the plate over the pipe. The reason to use the pipe instead of the EMT in the vise is that the EMT probably won't stand up to being clamped in the vise or the hammering.
Overall, I admire the ingenuity, of adapting available materials to work using common tools. I do agree that welding/brazing is better, but if you don't have access to those tools, then cleverness can sometimes make up for it.
As for the bolt points, if you can somehow bend the EMT ends around the pieces that it connects to (I'm thinking of the inner pieces that hold the wheels), then you'll reduce the shear loads on the bolts. What I mean is to flatten the ends with your BFH, then use the same pipe and vise to make the curve. I don't know how well it will work with the EMT, but it's something to try.
Also, use a serviceable thread lock (e.g. loctite) on the bolts. You don't want the nuts working their way loose, but you'll still have to tighten them periodically as the EMT compresses.
10-14-06, 11:29 AM
#5
put our Heads Together

Join Date: Jun 2003
Location: southeast pennsylvania
Posts: 3,155
Bikes: a mountain bike with a cargo box on the back and aero bars on the front. an old well-worn dahon folding bike
Mentioned: 0 Post(s)
Tagged: 0 Thread(s)
Quoted: 1 Post(s)
Likes: 0
Liked 0 Times
in
0 Posts
but the conduit will rust pretty quickly anyway since it's cheap and thin steel.
By the time my EMT conduit trailer was assembled it had been put on its side on concrete more than once. After being left outside and somewhat exposed to rainfall, the trailer got rust spots where the frame had scraped against the ground. But months later after being left outside continuously, the trailer hasn't rusted any more- just some superficial rust on the side.
I second the recommendation to use a hammer and nail (i think just about any nail will do) to score a spot where you can drill through the emt conduit. worked for me.
For getting bends started on your wheel dropout plates, you could try laying the conduit on the ground, putting the plates on the conduit, and standing on the plates with one foot on each side of the conduit. Any way you do it, though, that sounds like a challenging step.
10-14-06, 12:45 PM
#6
Mister Goody Two Shoes
Join Date: May 2006
Posts: 417
Mentioned: 0 Post(s)
Tagged: 0 Thread(s)
Quoted: 0 Post(s)
Likes: 0
Liked 0 Times
in
0 Posts
Originally Posted by cerewa
EMT conduit generally (or always?) is zinc-coated. this means a: if you weld it it will give off poisonous fumes (zinc oxide, i think) and b: it should only rust if you scrape the coating off.
Grinding will get it airborne, too. If you need to remove it, toilet bowl cleaner (muriatic acid) takes it off safely.
I'd suggest painting the whole thing, but then again, I've had a lot of experience welding and have had zinc poisoning a few times. That stuff makes me nervous.
10-16-06, 06:08 PM
#7
In the right lane
Thread Starter
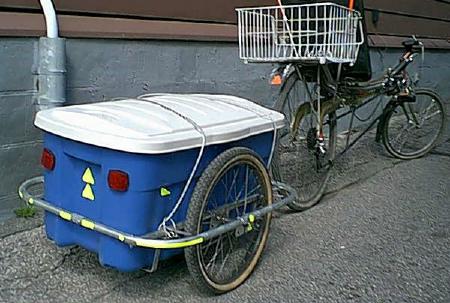
As I stated earlier, I was hoping to build a trailer to allow me to cart about 60-80 pounds of cargo -- probably groceries and other necessities. I won't be dragging a kayak or anything exotic.
I don't know if this design will work at 80 pounds, but by the times it's built, I'll let you know. Also, if it all falls apart at 40 pounds, I'll let you know too...
The DIY bike trailer kind of assumes you can get your hands on an old kid's bike and that you have a Rubbermaid box. If not, you can usually pick up a suitable bike for $5-10, but the Rubbermaid might cost you $20 or more. It also assumes that you will buy a trailer hitch like the Chariot at https://www.tinyride.com/%20Chariot-E...9&kwd=20100709. However, it is possible to make your own and there are some designs out there in google-space.
Parts list
* 2 10ft lengths 3/4 inch EMT conduit ($3.48 each)
* 4 4x4inch electrical plate cover ($.92 each)
* 1 3/4 inch EMT conduit connector ($.68)
* 1 3/4 inch wood dowel ($2.68)
* 2 2.5 inch by 1/4 galvanized screw and bolt(.27 each)
* 12 2 inch by 1/4 galvanized screw and bolt (.21 each)
* 1 Chariot trailer hitch (estimating $18)
* 2 20 inch bike wheels (assuming you have these... or buy a cheap child's bike at second-hand store)
* Rubbermaid box (? assuming you have one...)
* some metal strapping or even poly rope to hold box
Tools
* electric drill
* 4 inch (or so...) bench vise
* "vise grip" type pliers
* 1/4" , 1/8" and 3/8" drill bits (for metal)
* 3/4 inch conduit bender (9.28 rental or 38.00 to buy at Lowe's)
* hammer
* hack saw
* steel square (or anything, even a cardboard box, that can display a 90 degree angle)
The design
Sort of roughly, I worked with the idea of a 32 by 32 inch square build from two pieces of conduit. One of the pieces extend a further 12 inches forward and then bend in towards your bike's chainstay.

Bending conduit
I have never done this before, but googled a number of web site and got some instruction. Also, brief instructions are included on the side of many of the benders.

It's pretty easy to under or over bend, so you might need to check for square.

There are a couple of ways to do the actual bending. If you screw it up, you can try to straighten it out again.

or

I don't know if this design will work at 80 pounds, but by the times it's built, I'll let you know. Also, if it all falls apart at 40 pounds, I'll let you know too...
The DIY bike trailer kind of assumes you can get your hands on an old kid's bike and that you have a Rubbermaid box. If not, you can usually pick up a suitable bike for $5-10, but the Rubbermaid might cost you $20 or more. It also assumes that you will buy a trailer hitch like the Chariot at https://www.tinyride.com/%20Chariot-E...9&kwd=20100709. However, it is possible to make your own and there are some designs out there in google-space.
Parts list
* 2 10ft lengths 3/4 inch EMT conduit ($3.48 each)
* 4 4x4inch electrical plate cover ($.92 each)
* 1 3/4 inch EMT conduit connector ($.68)
* 1 3/4 inch wood dowel ($2.68)
* 2 2.5 inch by 1/4 galvanized screw and bolt(.27 each)
* 12 2 inch by 1/4 galvanized screw and bolt (.21 each)
* 1 Chariot trailer hitch (estimating $18)
* 2 20 inch bike wheels (assuming you have these... or buy a cheap child's bike at second-hand store)
* Rubbermaid box (? assuming you have one...)
* some metal strapping or even poly rope to hold box
Tools
* electric drill
* 4 inch (or so...) bench vise
* "vise grip" type pliers
* 1/4" , 1/8" and 3/8" drill bits (for metal)
* 3/4 inch conduit bender (9.28 rental or 38.00 to buy at Lowe's)
* hammer
* hack saw
* steel square (or anything, even a cardboard box, that can display a 90 degree angle)
The design
Sort of roughly, I worked with the idea of a 32 by 32 inch square build from two pieces of conduit. One of the pieces extend a further 12 inches forward and then bend in towards your bike's chainstay.
Bending conduit
I have never done this before, but googled a number of web site and got some instruction. Also, brief instructions are included on the side of many of the benders.
It's pretty easy to under or over bend, so you might need to check for square.
There are a couple of ways to do the actual bending. If you screw it up, you can try to straighten it out again.
or
10-16-06, 06:25 PM
#8
In the right lane
Thread Starter
Design concerns
By the way, I used a design from Mark Rehder at https://drumbent.com/trailer_big.html. He has some nice photos. I am just trying to add a few notes, comments and things I thought he missed, particularly a tools and parts list.
In thinking over the design, I was worried about 2 things.
* How to drill through the conduit. This wasn't really much of an issue when I purchased a small bench vise that would hold the conduit together. I also discovered that by scoring the pipe with a hack saw (just a small crease in it...), then using a small bit, I could create an indentation that would allow my 1/4" bit to rip right through it. Of course, a sharp bit is nice.


* The wheel axles are supposed to fit into a slot in the 4x4 electrical plate cover. But you also need to wrap the top of the plate around the conduit. Since the plate is 3/16" thick steel, I was a little concerned. However, with the vise holding the plate down, I could start bending it with my trusty vise-grip. Note: this is about the most tendious part of the work. But it is absolutely imperative that it wrap correctly.

In thinking over the design, I was worried about 2 things.
* How to drill through the conduit. This wasn't really much of an issue when I purchased a small bench vise that would hold the conduit together. I also discovered that by scoring the pipe with a hack saw (just a small crease in it...), then using a small bit, I could create an indentation that would allow my 1/4" bit to rip right through it. Of course, a sharp bit is nice.
* The wheel axles are supposed to fit into a slot in the 4x4 electrical plate cover. But you also need to wrap the top of the plate around the conduit. Since the plate is 3/16" thick steel, I was a little concerned. However, with the vise holding the plate down, I could start bending it with my trusty vise-grip. Note: this is about the most tendious part of the work. But it is absolutely imperative that it wrap correctly.
10-21-06, 08:00 PM
#9
In the right lane
Thread Starter
Dropouts
Putting the trailer together is taking a bit more time than I thought. My estimate is something like 8-12 hours for the whole thing. Already, I'm into my 8th hour.
I've figured out some of the items that initially concerned me. First of all, getting the dropout plates around the conduit is pretty simple when you have the technique down. To make the plate strong you need to wrap it around the conduit and put a couple of 1/4 inch bolts through the plate and pipe.
Mark a 1/2 inch wide channel for the wheel axle.Then drill a 3/8 inch hole about 1 inch from the bottom of the plate.

To bend the 4 by 4 inch electrical plate covers, you need to put the plate in a vise and, using a vise grip, bend the plate as much as you can. Then put a piece of conduit inside the plate and give it a couple of hard smacks with a hammer. The plate should start to bend around the conduit.
Put some 1/4 inch bolts through the plate and see if you can fit it around your wheel axle.

I'm getting close to having the major work done -- at least enough to try it out on the road --, but I managed to crack off my 1/4 inch drill bit. :-(
Putting the trailer together is taking a bit more time than I thought. My estimate is something like 8-12 hours for the whole thing. Already, I'm into my 8th hour.
I've figured out some of the items that initially concerned me. First of all, getting the dropout plates around the conduit is pretty simple when you have the technique down. To make the plate strong you need to wrap it around the conduit and put a couple of 1/4 inch bolts through the plate and pipe.
Mark a 1/2 inch wide channel for the wheel axle.Then drill a 3/8 inch hole about 1 inch from the bottom of the plate.
To bend the 4 by 4 inch electrical plate covers, you need to put the plate in a vise and, using a vise grip, bend the plate as much as you can. Then put a piece of conduit inside the plate and give it a couple of hard smacks with a hammer. The plate should start to bend around the conduit.
Put some 1/4 inch bolts through the plate and see if you can fit it around your wheel axle.
I'm getting close to having the major work done -- at least enough to try it out on the road --, but I managed to crack off my 1/4 inch drill bit. :-(
10-31-06, 09:41 AM
#10
put our Heads Together
Join Date: Jun 2003
Location: southeast pennsylvania
Posts: 3,155
Bikes: a mountain bike with a cargo box on the back and aero bars on the front. an old well-worn dahon folding bike
Mentioned: 0 Post(s)
Tagged: 0 Thread(s)
Quoted: 1 Post(s)
Likes: 0
Liked 0 Times
in
0 Posts
Note: it's possible to "kink" EMT conduit when you bend it with a conduit bender. The first bend I made was slightly kinked. A kink in a curve will weaken the tube a fair bit.
the third image (second photograph) in post #7 is a good example of a partly-kinked bend.
The directions on the conduit bender I used pointed out that this was a possible problem and that one should remedy it by making sure to put pressure on the conduit as close to the place it goes through the bender as you can. I needed the additional leverage of putting pressure on the conduit fairly far out, so I made sure to put pressure in two places, one a couple inches from the bend point and another a few feet out.
