


Sanding down a seatpost
 03-11-11, 06:23 PM
#26

Senior Member

Robbie pretty much desribed my method, but I do the full length of the post.
 03-11-11, 10:52 PM
#27
Senior Member

Join Date: Jul 2006
Location: Toronto (again) Ontario, Canada
Posts: 6,931
Bikes: Old Bike: 1975 Raleigh Delta, New Bike: 2004 Norco Bushpilot
Likes: 0
Liked 5 Times
in
5 Posts
What about a chromed steel post? Here is the problem, some genius put too small a post in there and then cranked the bolt to the point that it was tight, leaving the ears and slot pinched together, the smallest post I could find 25.4mm does not quite fit (think the hole is about 25.3mm, so I need to widen the slot, tried a steel wedge and a BFH, but that did not work.... Thinking I might try a claw hammer claw and put my 225lbs behind it, but figure I will probably break the hammer. Maybe if I can put a claw in there and whack the other end of the hammer head it might open up slightly.
03-11-11, 10:59 PM
#28

aka Tom Reingold

Join Date: Jan 2009
Location: New York, NY, and High Falls, NY, USA
Posts: 40,716
Bikes: 1962 Rudge Sports, 1971 Raleigh Super Course, 1971 Raleigh Pro Track, 1974 Raleigh International, 1975 Viscount Fixie, 1982 McLean, 1996 Lemond (Ti), 2002 Burley Zydeco tandem
Liked 2,655 Times
in
1,542 Posts
Wogsterca, I widen the ears with a very large screwdriver.
I don't sand down seatposts. I ream the seattube with an adjustable reamer. I might buy one some day. The real expensive thing seems to be the handle for it.
I don't sand down seatposts. I ream the seattube with an adjustable reamer. I might buy one some day. The real expensive thing seems to be the handle for it.
__________________
Tom Reingold, tom@noglider.com
New York City and High Falls, NY
Blogs: The Experienced Cyclist; noglider's ride blog
�When man invented the bicycle he reached the peak of his attainments.� � Elizabeth West, US author
Please email me rather than PM'ing me. Thanks.
Tom Reingold, tom@noglider.com
New York City and High Falls, NY
Blogs: The Experienced Cyclist; noglider's ride blog
�When man invented the bicycle he reached the peak of his attainments.� � Elizabeth West, US author
Please email me rather than PM'ing me. Thanks.
 03-11-11, 11:13 PM
#29
Senior Member
Join Date: Dec 2009
Posts: 437
Bikes: late 80's bianchi campion d'italia, early 90's trek 2100, early 90's shogun selectra, mid 90's aluminum marin xcMTB, dept. store grade but upgraded columbia double eagle tandem
Likes: 0
Liked 0 Times
in
0 Posts
I just use my mad hot angl grndr skilz, yo! (srsly.)
This method is really only appropriate for beaters with missing seat posts, as the end result is not going to be "pretty". Every other method posted here is more appropriate for a true C&V bike.
This method is really only appropriate for beaters with missing seat posts, as the end result is not going to be "pretty". Every other method posted here is more appropriate for a true C&V bike.
08-07-13, 02:17 PM
#30
Senior Member

Join Date: Aug 2009
Location: Berkeley, CA
Posts: 7,303
Bikes: '72 Cilo Pacer, '72 Gitane Gran Tourisme, '72 Peugeot PX10, '73 Speedwell Ti, '74 Peugeot UE-8, '75 Peugeot PR-10L, '80 Colnago Super, '85 De Rosa Pro, '86 Look Equipe 753, '86 Look KG86, '89 Parkpre Team, '90 Parkpre Team MTB, '90 Merlin
Liked 2,302 Times
in
588 Posts
Bumping an old thread to add on a question....
I recently acquired a 26.8mm Campagnolo Nuovo Record seat post with the intention of turning it into a 26.6mm post. Originally I had planned to sand it down following the suggestions above. However, a good friend of mine owns a machine shop and has offered to help turn it down to 26.6mm with his metal lathe. I've never visited his shop, so this would be a perfect excuse. He wouldn't charge me, and I'm sure he can do the work with far more precision than I'd ever hope to achieve with sand paper in hand. This leads to me to my question....I don't want to turn the entire post down and loose the Campagnolo engraved logo, but I don't want a very noticeable ridge running around the middle of the post either. So, what's the best way to handle the transition from the new 26.6mm section to the original 26.8mm section? One thought is to make a couple transitions (somewhere above the seat tube entry point but below the logo--say from 26.6mm to 26.7mm, and another transition from 26.7mm to 26.8) and then smooth out those transitions by hand with sand paper. But maybe there's a better way? Or should it be possible to make a nice smooth transition from 26.6 to 26.8 with a lathe? Thoughts or suggestions?
I will pose these questions to my machinist friend, too, but thought I'd pose the question here first since a) he doesn't usually work on bike parts, and b) I don't want to set my expectations so high as to be an imposition.
08-07-13, 02:36 PM
#31
Senior Member
Join Date: Jul 2009
Posts: 11,128
Bikes: 1986 Alan Record Carbonio, 1985 Vitus Plus Carbone 7, 1984 Peugeot PSV, 1972 Line Seeker, 1986(est.) Medici Aerodynamic (Project), 1985(est.) Peugeot PY10FC
Likes: 0
Liked 34 Times
in
28 Posts
On Exxon Grafteks they turned down Campy NR seaposts from 26mm to 23mm OD and they avoided making a ridge and maintained the Campy engraved logo on top of the seatpost shaft by having a transition slope cut in within maybe an inch and a half length of the seatpost shaft to gradually come out to the original OD just below the Campy logo.
You can still kinda see the conical shape produced by the transition area, but it is subtle enough that it does not look bad at all. As you might see on this pic of what was similarly done on my Line Seeker bike....
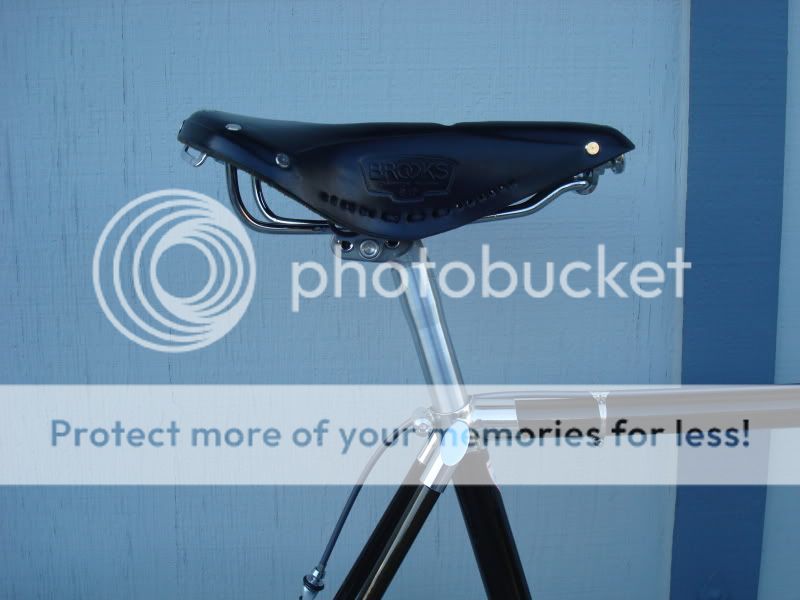
I can take closer pictures of the seatpost on my Line Seeker later and post them up here too....
I suspect that it will be hard to notice the transition on you seatpos if you do the same, as you will not be taking off as much material as they did on mine.
Chombi
You can still kinda see the conical shape produced by the transition area, but it is subtle enough that it does not look bad at all. As you might see on this pic of what was similarly done on my Line Seeker bike....
I can take closer pictures of the seatpost on my Line Seeker later and post them up here too....
I suspect that it will be hard to notice the transition on you seatpos if you do the same, as you will not be taking off as much material as they did on mine.
Chombi
Last edited by Chombi; 08-07-13 at 02:45 PM.
08-07-13, 02:42 PM
#32
Senior Member
Join Date: Aug 2009
Location: Berkeley, CA
Posts: 7,303
Bikes: '72 Cilo Pacer, '72 Gitane Gran Tourisme, '72 Peugeot PX10, '73 Speedwell Ti, '74 Peugeot UE-8, '75 Peugeot PR-10L, '80 Colnago Super, '85 De Rosa Pro, '86 Look Equipe 753, '86 Look KG86, '89 Parkpre Team, '90 Parkpre Team MTB, '90 Merlin
Liked 2,302 Times
in
588 Posts
^Thanks, Chombi. That's reassuring. Obviously, 26mm to 23mm transition is much bigger than the .2mm transition I would have. Maybe I'm making a mountain out of a molehill.
08-07-13, 03:09 PM
#33
Senior Member
Join Date: Jul 2009
Posts: 11,128
Bikes: 1986 Alan Record Carbonio, 1985 Vitus Plus Carbone 7, 1984 Peugeot PSV, 1972 Line Seeker, 1986(est.) Medici Aerodynamic (Project), 1985(est.) Peugeot PY10FC
Likes: 0
Liked 34 Times
in
28 Posts
 But I still think it's bigger a transition than what you are anticipating for your seatpost.... I'll get back with you tonight on this....

 08-08-13, 03:27 AM
#35
Senior Member
Join Date: Jul 2009
Posts: 11,128
Bikes: 1986 Alan Record Carbonio, 1985 Vitus Plus Carbone 7, 1984 Peugeot PSV, 1972 Line Seeker, 1986(est.) Medici Aerodynamic (Project), 1985(est.) Peugeot PY10FC
Likes: 0
Liked 34 Times
in
28 Posts
OK, I checked and the NR seatpost on my bike was turned down from 26mm to 23.8mm As you can see in the pic I posted, the conical transition is hardly noticeable...
BTW, they also machined out the inside of the seatpost shaft to lighten it up, as the NR seatpost shaft walls were pretty thick. You might want to considier having that done too...
BTW, they also machined out the inside of the seatpost shaft to lighten it up, as the NR seatpost shaft walls were pretty thick. You might want to considier having that done too...
08-08-13, 05:17 AM
#36
Senior Member

I paid my local machine shop $20 to turn down a post from 26.4 to 26.2. They matched the old machine marks perfectly.
08-08-13, 05:29 AM
#37
Senior Member

Join Date: Apr 2005
Location: Ann Arbor, MI
Posts: 16,922
Bikes: 1980 Masi, 1984 Mondonico, 1984 Trek 610, 1980 Woodrup Giro, 2005 Mondonico Futura Leggera ELOS, 1967 PX10E, 1971 Peugeot UO-8
Liked 674 Times
in
514 Posts
Bumping an old thread to add on a question....
I recently acquired a 26.8mm Campagnolo Nuovo Record seat post with the intention of turning it into a 26.6mm post. Originally I had planned to sand it down following the suggestions above. However, a good friend of mine owns a machine shop and has offered to help turn it down to 26.6mm with his metal lathe. I've never visited his shop, so this would be a perfect excuse. He wouldn't charge me, and I'm sure he can do the work with far more precision than I'd ever hope to achieve with sand paper in hand. This leads to me to my question....I don't want to turn the entire post down and loose the Campagnolo engraved logo, but I don't want a very noticeable ridge running around the middle of the post either. So, what's the best way to handle the transition from the new 26.6mm section to the original 26.8mm section? One thought is to make a couple transitions (somewhere above the seat tube entry point but below the logo--say from 26.6mm to 26.7mm, and another transition from 26.7mm to 26.8) and then smooth out those transitions by hand with sand paper. But maybe there's a better way? Or should it be possible to make a nice smooth transition from 26.6 to 26.8 with a lathe? Thoughts or suggestions?
I will pose these questions to my machinist friend, too, but thought I'd pose the question here first since a) he doesn't usually work on bike parts, and b) I don't want to set my expectations so high as to be an imposition.
I recently acquired a 26.8mm Campagnolo Nuovo Record seat post with the intention of turning it into a 26.6mm post. Originally I had planned to sand it down following the suggestions above. However, a good friend of mine owns a machine shop and has offered to help turn it down to 26.6mm with his metal lathe. I've never visited his shop, so this would be a perfect excuse. He wouldn't charge me, and I'm sure he can do the work with far more precision than I'd ever hope to achieve with sand paper in hand. This leads to me to my question....I don't want to turn the entire post down and loose the Campagnolo engraved logo, but I don't want a very noticeable ridge running around the middle of the post either. So, what's the best way to handle the transition from the new 26.6mm section to the original 26.8mm section? One thought is to make a couple transitions (somewhere above the seat tube entry point but below the logo--say from 26.6mm to 26.7mm, and another transition from 26.7mm to 26.8) and then smooth out those transitions by hand with sand paper. But maybe there's a better way? Or should it be possible to make a nice smooth transition from 26.6 to 26.8 with a lathe? Thoughts or suggestions?
I will pose these questions to my machinist friend, too, but thought I'd pose the question here first since a) he doesn't usually work on bike parts, and b) I don't want to set my expectations so high as to be an imposition.
08-08-13, 11:27 AM
#38
Senior Member
Join Date: Jul 2009
Posts: 11,128
Bikes: 1986 Alan Record Carbonio, 1985 Vitus Plus Carbone 7, 1984 Peugeot PSV, 1972 Line Seeker, 1986(est.) Medici Aerodynamic (Project), 1985(est.) Peugeot PY10FC
Likes: 0
Liked 34 Times
in
28 Posts
This is a good opportunity to take advantage of buying a not so expensive used NR post that might have deep scratches and gouges at the bottom half of the shaft. As that surface will be machined off anyway, the final product could look just the same as one might have bought a more pristine/more expensive example.....
08-08-13, 11:36 AM
#39
Senior Member
Join Date: Aug 2009
Location: Berkeley, CA
Posts: 7,303
Bikes: '72 Cilo Pacer, '72 Gitane Gran Tourisme, '72 Peugeot PX10, '73 Speedwell Ti, '74 Peugeot UE-8, '75 Peugeot PR-10L, '80 Colnago Super, '85 De Rosa Pro, '86 Look Equipe 753, '86 Look KG86, '89 Parkpre Team, '90 Parkpre Team MTB, '90 Merlin
Liked 2,302 Times
in
588 Posts
Thanks, everyone, for the feedback.
I'm coming around to this. Still, even a .1mm ridge will be noticeable (and would bother me), so I'd like to figure out the best way to smooth out that transition--be it on the lathe or later by hand.
Interesting. I hadn't considered any machine marks. My post is going to be polished smooth, so it's not a concern in this case but I'll keep that in mind.
Yes, understood. However, I got a great deal on the one I have, and I'll likely keep the post with the frame for the foreseeable future. Any reduction in value to the existing post will be negated by the cost of securing a new 26.4 NR two-bolt post.
Thanks for your input and for the comparative measurements.
But I already have a NR post and an offer to turn it down by a professional machinist, so it's not going to cost anything versus the cost of securing a new 26.4 Capagnolo post ($$$!). It's not so easy to find a 26.4 Campy post in any condition, let alone a "not so expensive" one.
I'm coming around to this. Still, even a .1mm ridge will be noticeable (and would bother me), so I'd like to figure out the best way to smooth out that transition--be it on the lathe or later by hand.
OK, I checked and the NR seatpost on my bike was turned down from 26mm to 23.8mm As you can see in the pic I posted, the conical transition is hardly noticeable...
BTW, they also machined out the inside of the seatpost shaft to lighten it up, as the NR seatpost shaft walls were pretty thick. You might want to considier having that done too...
BTW, they also machined out the inside of the seatpost shaft to lighten it up, as the NR seatpost shaft walls were pretty thick. You might want to considier having that done too...
This is a good opportunity to take advantage of buying a not so expensive used NR post that might have deep scratches and gouges at the bottom half of the shaft. As that surface will be machined off anyway, the final product could look just the same as one might have bought a more pristine/more expensive example.....
__________________
-Randy
'72 Cilo Pacer � '72 Peugeot PX10 � '73 Speedwell Ti � '74 Nishiki Competition � '74 Peugeot UE-8 � '86 Look Equipe 753 � '86 Look KG86 � '89 Parkpre Team Road � '90 Parkpre Team MTB � '90 Merlin Ti
Avatar photo courtesy of jeffveloart.com, contact: contact: jeffnil8 (at) gmail.com.
-Randy
'72 Cilo Pacer � '72 Peugeot PX10 � '73 Speedwell Ti � '74 Nishiki Competition � '74 Peugeot UE-8 � '86 Look Equipe 753 � '86 Look KG86 � '89 Parkpre Team Road � '90 Parkpre Team MTB � '90 Merlin Ti
Avatar photo courtesy of jeffveloart.com, contact: contact: jeffnil8 (at) gmail.com.
Last edited by gaucho777; 08-08-13 at 11:42 AM.
02-11-15, 12:24 AM
#40
Newbie
Join Date: Feb 2015
Posts: 1
Likes: 0
Liked 0 Times
in
0 Posts
For posterity, specifically for those who lack patience or are in poverty. I just turned down a 27.2mm aluminum seatpost to 27mm using a cordless drill. I chucked up the longest bit I had and then taped a shop rag around the bit to a diameter just larger then the ID of the seatpost. From here it was just several stages of sand paper, finished off with some steal wool. Cheers!
02-11-15, 09:37 AM
#41
This started out as an inexpensive $12.00, 27.0mm seat post purchased through the C&V Sales forum. Hand sanded, polished and painted it to a 26.8mm post for my 81 Team Miyata.


Last edited by m_sasso; 02-11-15 at 12:20 PM.
02-11-15, 10:09 AM
#42
Senior Member
Join Date: Sep 2014
Location: Pasadena, Ca
Posts: 126
Bikes: 1972 Gitane Super Corsa Frankenbike, 1972 Motobecane Le Champion, Motobecane Grand Jubile, 1980 Bianchi Campione di Italia, 1984 Paramount, Trek 620, Trek 720, Cannondale 3.0, Kestrel 200sci, Kestrel 200EMS, Bob Jackson Tandem
Liked 5 Times
in
2 Posts
Im from the more power is better school. Belt sander, followed by finer grit (by hand). Check repeatedly by inserting into seat tube. Once I get the fit close enough, off to the polishing wheel/buffer. Good enough for the week end warrior.
02-11-15, 10:15 AM
#43
Senior Member

That's interesting. I'm wondering how you keep the post perfectly concentric...round..using a belt sander. Just eyeball it?
02-11-15, 10:18 AM
#44
Senior Member
When I've contemplated this proceedure, reading other threads, I'm real curious how the machinist would hold the post in order to turn down the whole length. Would love to learn how they did it. Of course, competent machinists have all kinds of tricks up their sleeves.
02-11-15, 10:40 AM
#45
Senior Member
Join Date: May 2008
Location: Fredericksburg, Va
Posts: 9,644
Bikes: '65 Frejus TDF, '73 Bottecchia Giro d'Italia, '83 Colnago Superissimo, '84 Trek 610, '84 Trek 760, '88 Pinarello Veneto, '88 De Rosa Pro, '89 Pinarello Montello, '94 Burley Duet, 97 Specialized RockHopper, 2010 Langster, Tern Link D8
Liked 2,269 Times
in
1,133 Posts
WRT the post diam reduction, ditto for both [MENTION=29368]rootboy[/MENTION] comments above
WRT the ST cleaning. I have used the three block hone with success. There are several "grits" available. The slot isn't big enough to really make a difference at speed as long as it is deburred. I have also used a 12 ga bore brush, with an extender, to knock off the loose stuff.
WRT the ST cleaning. I have used the three block hone with success. There are several "grits" available. The slot isn't big enough to really make a difference at speed as long as it is deburred. I have also used a 12 ga bore brush, with an extender, to knock off the loose stuff.
02-11-15, 02:53 PM
#46
Senior Member
Join Date: Sep 2014
Location: Pasadena, Ca
Posts: 126
Bikes: 1972 Gitane Super Corsa Frankenbike, 1972 Motobecane Le Champion, Motobecane Grand Jubile, 1980 Bianchi Campione di Italia, 1984 Paramount, Trek 620, Trek 720, Cannondale 3.0, Kestrel 200sci, Kestrel 200EMS, Bob Jackson Tandem
Liked 5 Times
in
2 Posts
Eye balling the fit after belt sanding seems to be good enough. THe key is it to take it slow and check against the seat tube fit often. Looking over the other responses, I think taking a cylinder honing bore to the seat tube is probably the best and cleanest route to go…still keep in mind to be conservative and do a little at time… you can't add metal back to the seat tube once its been removed.
02-11-15, 06:07 PM
#47
Senior Member
Makes more sense to alter a replaceable item like a seat post, to me. If you have to.
I tend to just obtain the correct size.
02-11-15, 07:12 PM
#48
Get off my lawn!
Join Date: Nov 2010
Location: The Garden State
Posts: 6,031
Bikes: 1917 Loomis, 1923 Rudge, 1930 Hercules Renown, 1947 Mclean, 1948 JA Holland, 1955 Hetchins, 1957 Carlton Flyer, 1962 Raleigh Sport, 1978&81 Raleigh Gomp GS', 2010 Raliegh Clubman
Likes: 0
Liked 99 Times
in
49 Posts
I've honed a post using a file & sandpaper. Worked fine, go slow. It took about 3 hours to remove 1.5mm
02-12-15, 08:55 AM
#49
All Campy All The Time
Join Date: Nov 2013
Location: Richmond, Virginia
Posts: 1,420
Bikes: Listed in my signature.
Liked 116 Times
in
64 Posts
I put a cheapo post in the lathe and turned in down .2 mm. Chucked it by the bottom 1" and then cut off that last 1" when I was done. I would never do that to a great post.

