


How I Make Decals for My Bikes
 09-11-24, 04:11 PM
#1

Member
Thread Starter
How I Make Decals for My Bikes
Whenever I see someone in the forums asking how to source decals for a bike, I weigh in with “just make your own!” Upon reflection, it might be more helpful if I show how I have gone about it in case it helps someone give it a try.
I don’t claim my way is the only way, the best way, or possibly even the easiest way. It’s just how I have done it so far. I have seen examples of great-looking decals that other forum members have made, so I’m sure there are other ways to do this. And each time I make decals, I try to evolve how I do it based on what I learned in prior projects and from other people.
It's probably also worth mentioning that I just do these for myself. I don't sell them and I'm not looking to start. You may decide anyway that they are not saleable.
Making a Set of Decals
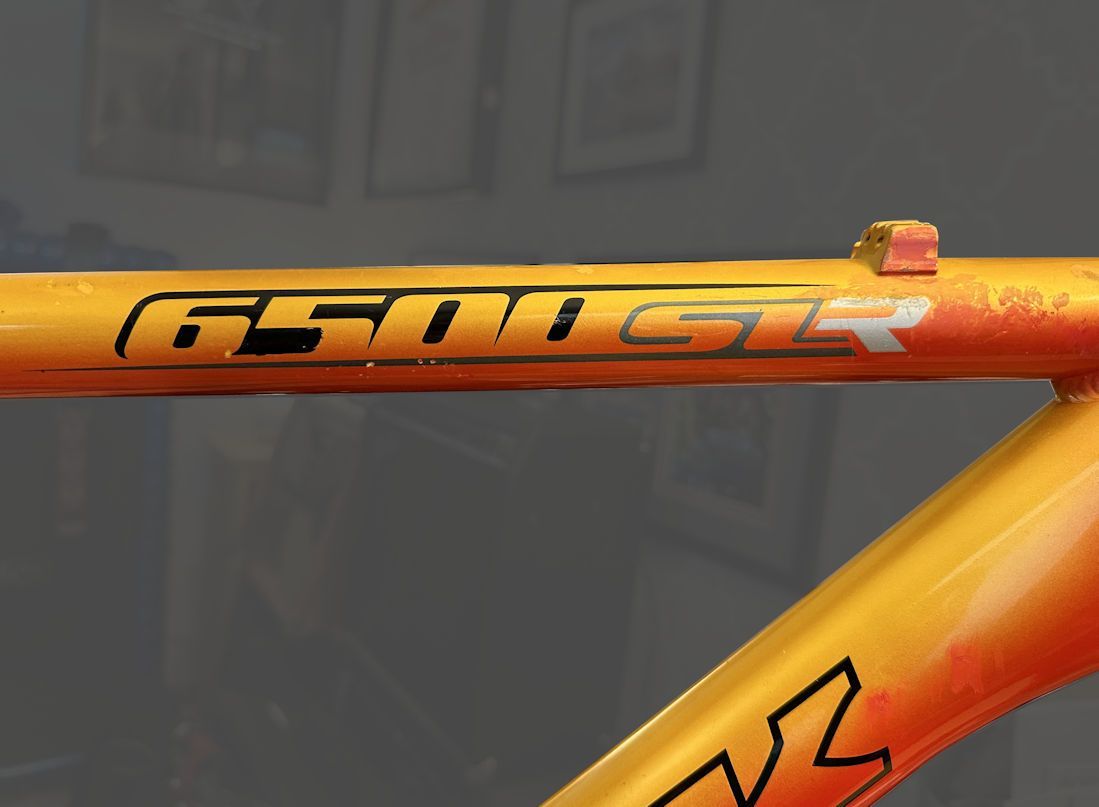
I’ll walk through a recent project to show how I made the decals for it. This was a bike frame that had paint I couldn’t rescue. Thus, I found myself having to strip it down to bare metal for a repaint. This meant I would be recreating the original decals,
First I Took Photos. Lots of Photos.
Before I stripped the paint and decals off the frame, I took pictures of all the decals, trying to get head-on shots of everything while trying to introduce as little camera-position (perspective) distortion as possible. While drawing the new decals, I can generally compensate for distortion from the curve of the tubes if I haven’t made things worse with perspective distortion.
I don’t claim my way is the only way, the best way, or possibly even the easiest way. It’s just how I have done it so far. I have seen examples of great-looking decals that other forum members have made, so I’m sure there are other ways to do this. And each time I make decals, I try to evolve how I do it based on what I learned in prior projects and from other people.
It's probably also worth mentioning that I just do these for myself. I don't sell them and I'm not looking to start. You may decide anyway that they are not saleable.
Making a Set of Decals
I’ll walk through a recent project to show how I made the decals for it. This was a bike frame that had paint I couldn’t rescue. Thus, I found myself having to strip it down to bare metal for a repaint. This meant I would be recreating the original decals,
First I Took Photos. Lots of Photos.
Before I stripped the paint and decals off the frame, I took pictures of all the decals, trying to get head-on shots of everything while trying to introduce as little camera-position (perspective) distortion as possible. While drawing the new decals, I can generally compensate for distortion from the curve of the tubes if I haven’t made things worse with perspective distortion.
__________________
Living life on the small chainring.
Living life on the small chainring.
Last edited by daywood; 09-11-24 at 05:16 PM.

Likes For daywood:
09-11-24, 04:14 PM
#2
Member
Thread Starter
Tracing Existing Decals
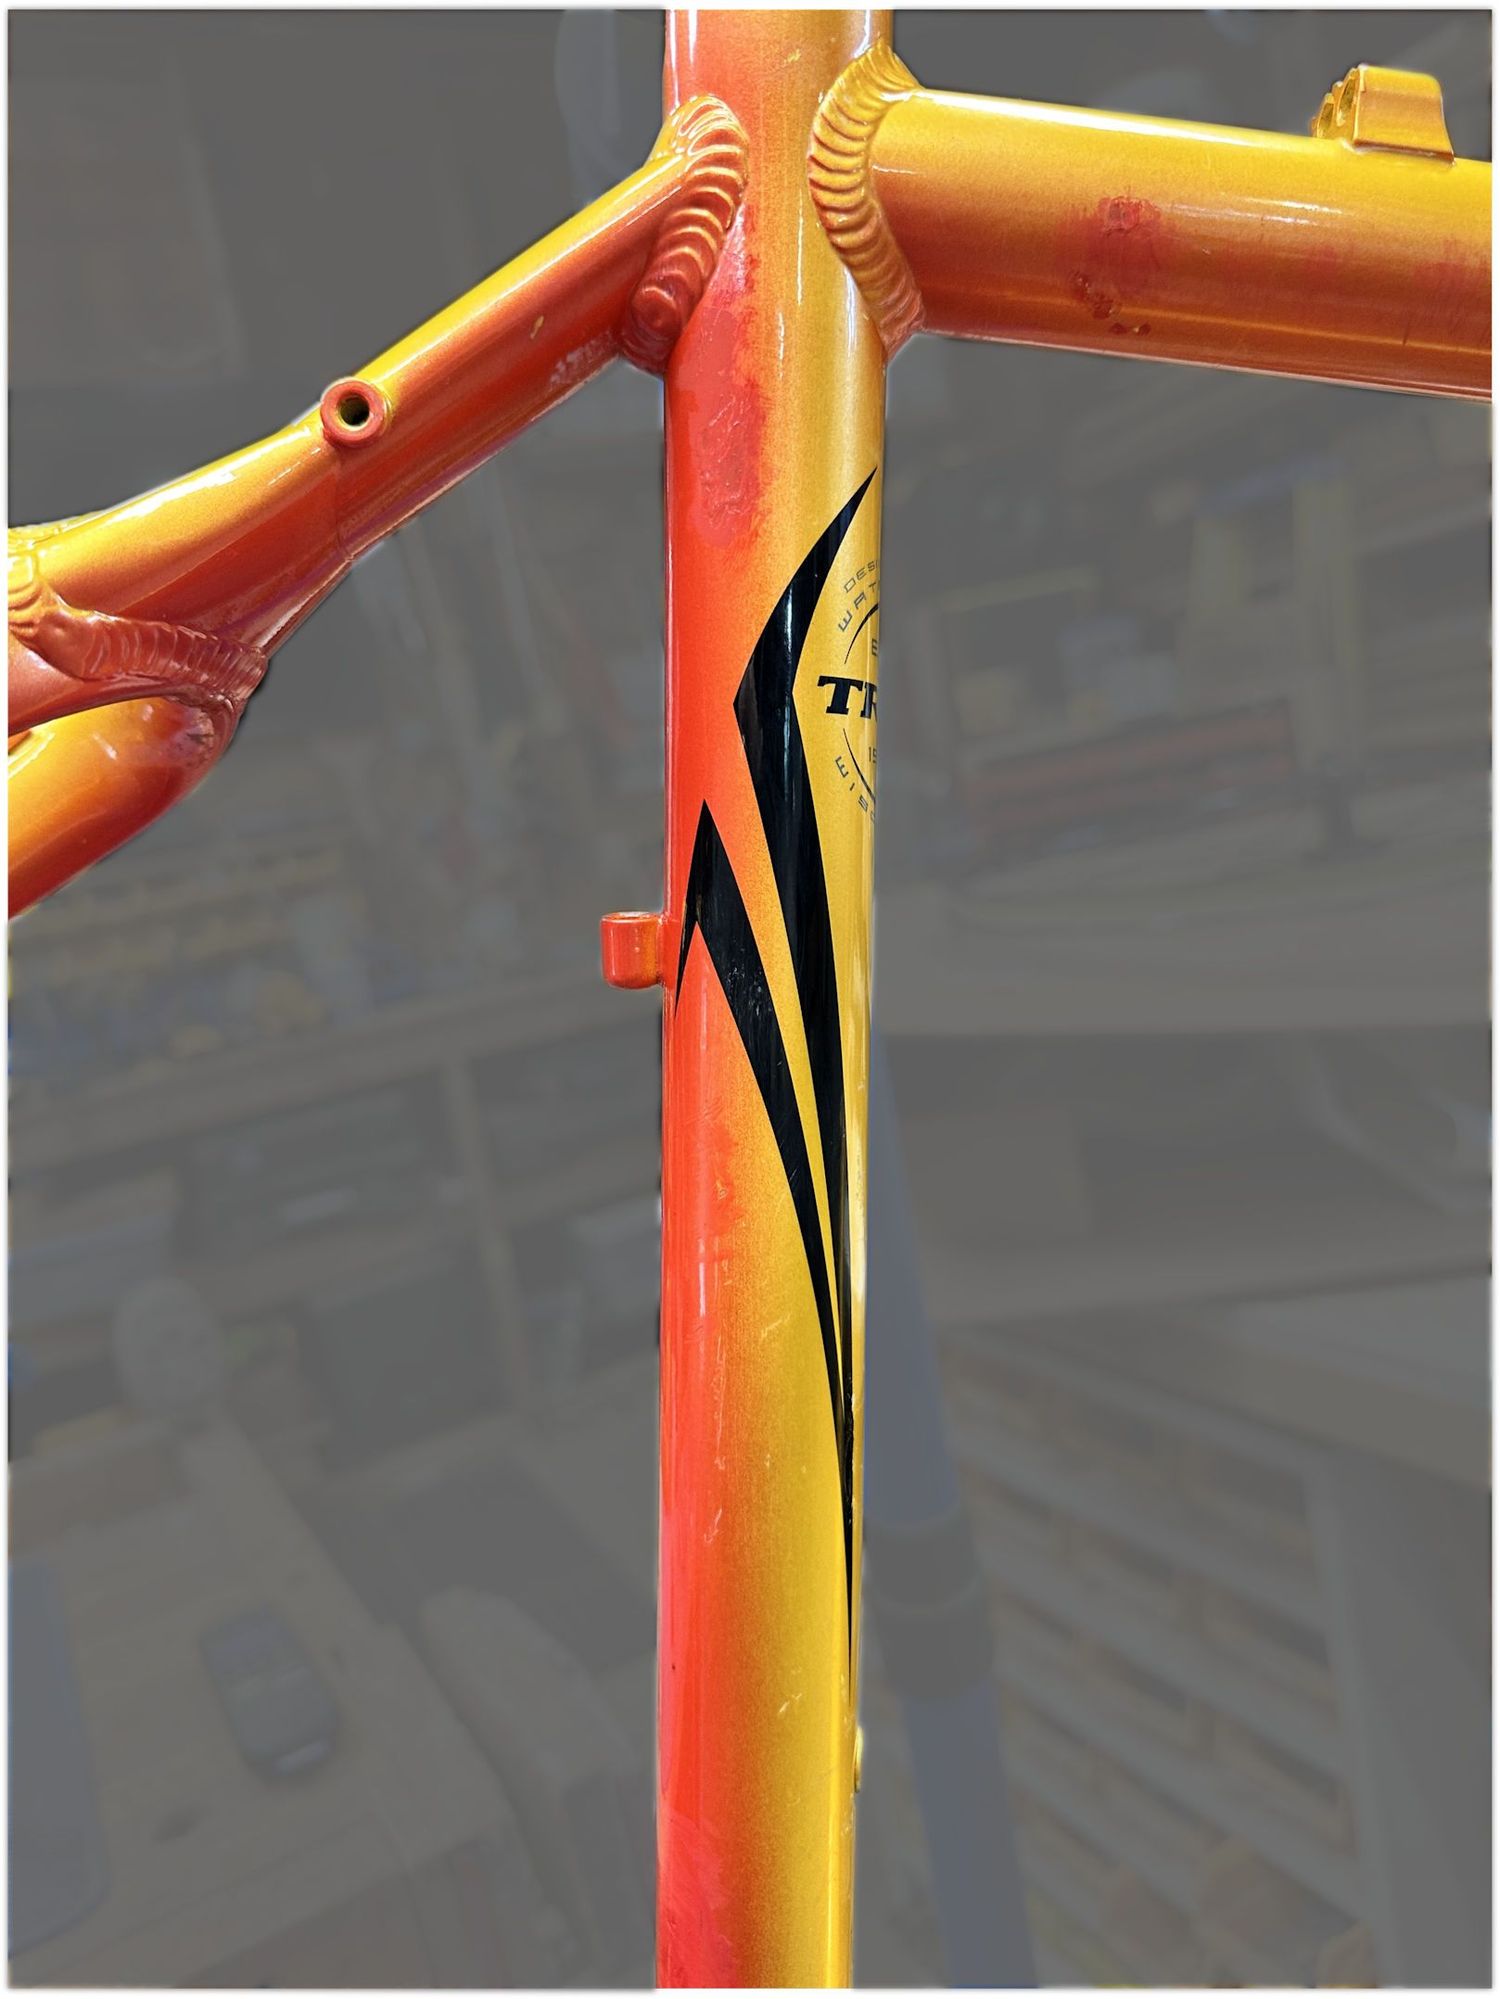
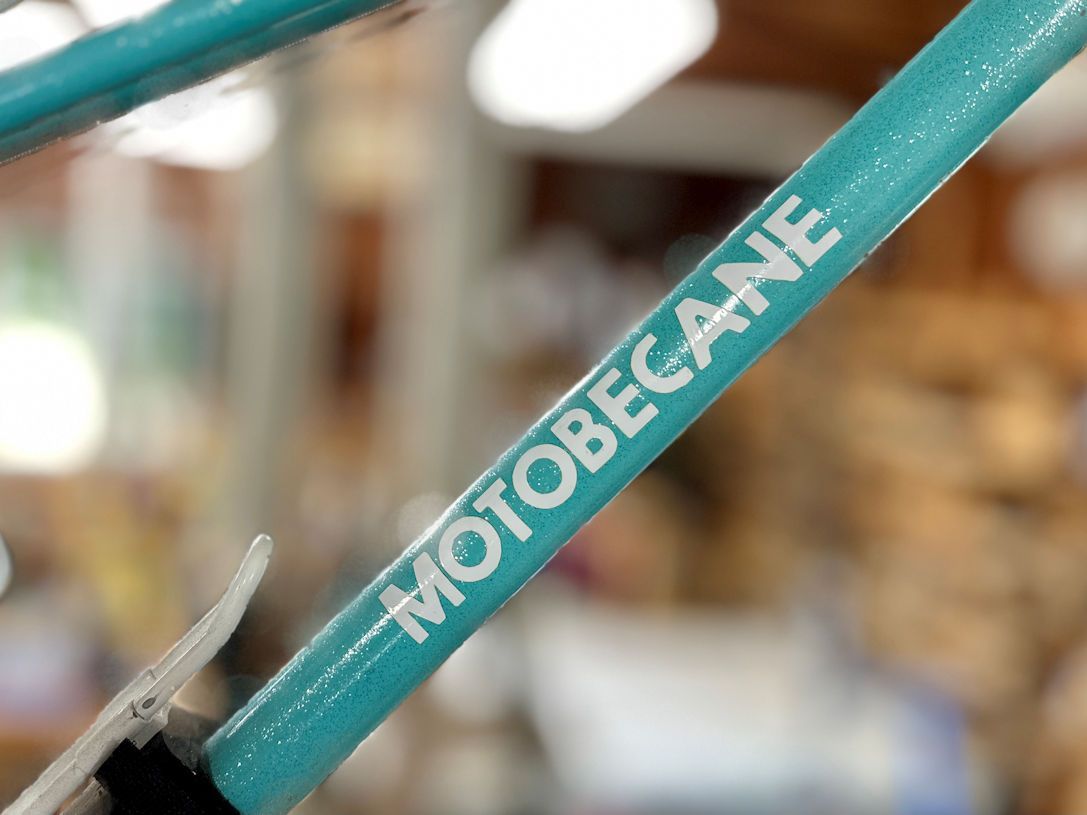
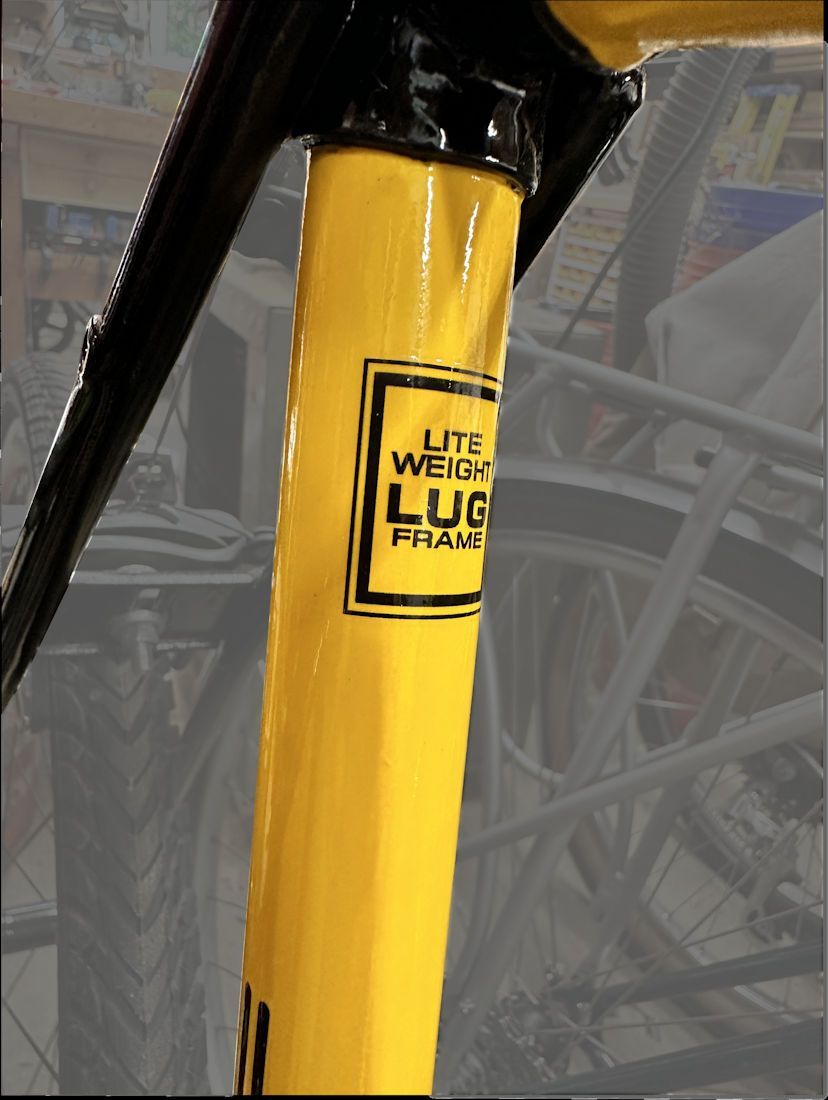
I used frisket to trace the outline of decals that were wrapped around frame tubes so much that it made photos difficult to use as the only reference. Frisket is a semi-transparent, lightly adhesive sheet of vinyl that is used mostly by air-brushers to mask off areas and to create stencils for layering colors.
I used 15 X 10-inch sheets of frisket, which are plenty big enough for what I need to do. I cut out a piece of it that was just big enough to cover the decal, and I stuck it over the decal on the bike tube.
(The photo below is demonstrating the process using the finished decal because I didn’t shoot a picture of me tracing the original decal.)
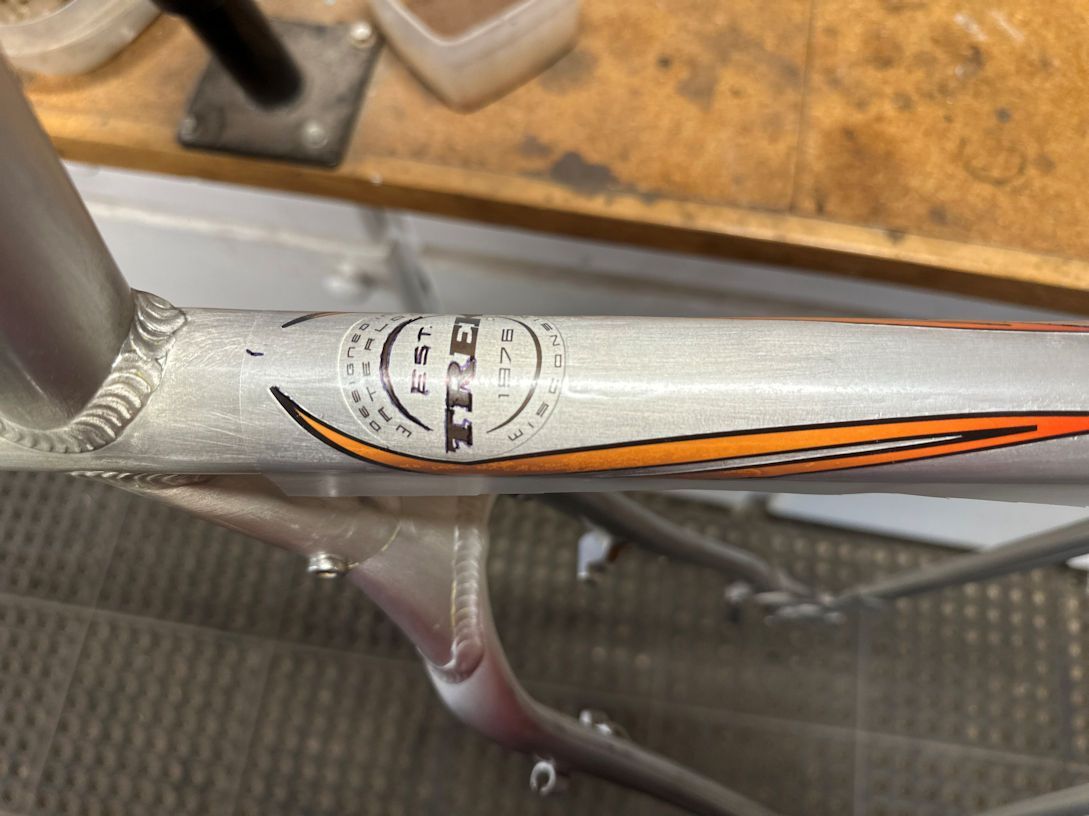
After I traced a decal onto the frisket for this project, I pulled the frisket back off the frame tube, stuck it onto a piece of printer paper, and ran it through my scanner to create a JPG image file of the tracing. Like with photos, I imported the scanned image into my graphics software to use as reference.
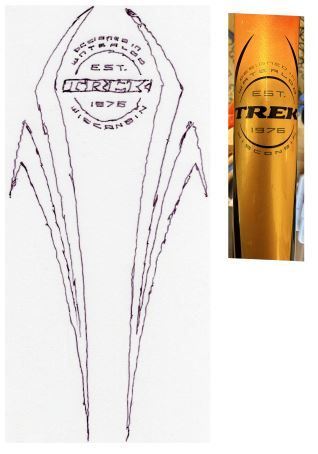
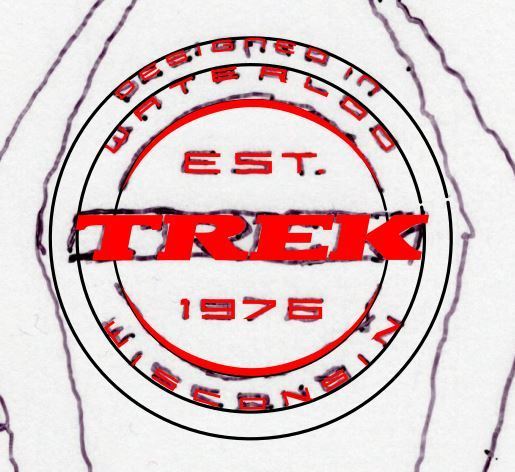
Here is a tracing I did for this project. I know it looks like it was done by an octogenarian on meth, but you try tracing on a hard, curved surface with a fine-point Sharpie with no good way to steady your drawing hand.
I used frisket to trace the outline of decals that were wrapped around frame tubes so much that it made photos difficult to use as the only reference. Frisket is a semi-transparent, lightly adhesive sheet of vinyl that is used mostly by air-brushers to mask off areas and to create stencils for layering colors.
I used 15 X 10-inch sheets of frisket, which are plenty big enough for what I need to do. I cut out a piece of it that was just big enough to cover the decal, and I stuck it over the decal on the bike tube.
(The photo below is demonstrating the process using the finished decal because I didn’t shoot a picture of me tracing the original decal.)
After I traced a decal onto the frisket for this project, I pulled the frisket back off the frame tube, stuck it onto a piece of printer paper, and ran it through my scanner to create a JPG image file of the tracing. Like with photos, I imported the scanned image into my graphics software to use as reference.
Here is a tracing I did for this project. I know it looks like it was done by an octogenarian on meth, but you try tracing on a hard, curved surface with a fine-point Sharpie with no good way to steady your drawing hand.
__________________
Living life on the small chainring.
Living life on the small chainring.
Last edited by daywood; 09-11-24 at 05:02 PM.
09-11-24, 04:16 PM
#3
Member
Thread Starter
Measurements
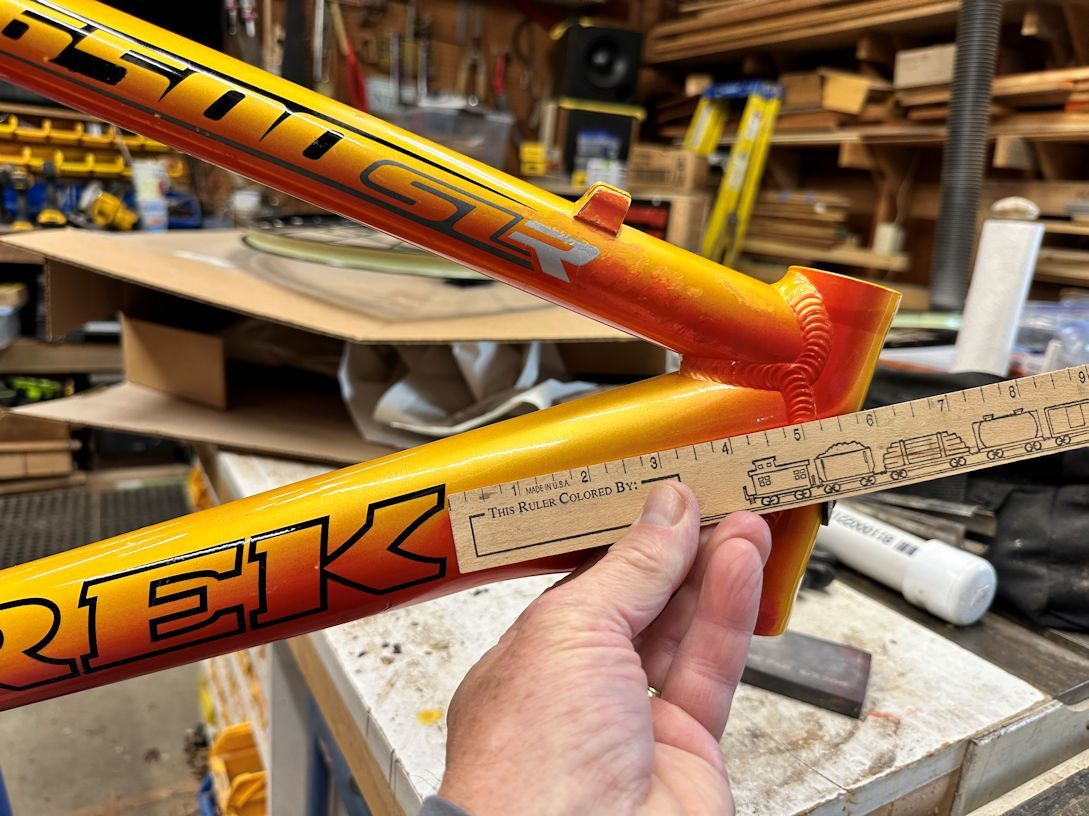
I took measurements of the height and width of the original decals, and of where they are positioned on the frame tubes. I used a cloth measuring tape for measurements around the curvature of frame tubes.
A measurement of the dimension of the decal that wraps around the tube is useful because a straight-on photo takes the curve out of the decal. It will look shorter (or narrower) in the photo than it really is. So, If I have drawn the new decal over a photo of it in my drawing software, I will stretch it to the correct height (or width) when I’m finished, based on the measurement.
The distortion in the photo of the curve isn’t linear, so stretching it doesn’t correct it exactly as it should. But we’re usually talking about a small amount of stretching, so it works reasonably well.
I also took photos with a ruler in them to capture the size or position of a decal along a tube. This is valuable reference for making and printing the new decals, and for getting them positioned where they originally were on the bike frame.
Other Sources of Reference Information for Decals
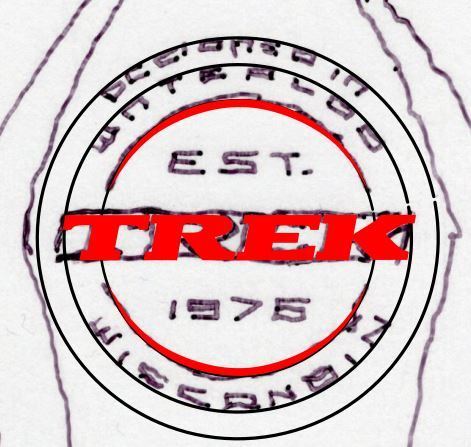
The decals on this bike were all in good shape, so they provided good reference sources. I had projects in the past where big chunks of a decal had been scraped off. In those cases, I had good luck with image searches online and then importing relevant images into my drawing software for reference. I could, for instance, search for “Trek logo.”
I have also searched for high-resolution pictures of bikes that had the same decals as what I’m trying to recreate. I sometimes hit the jackpot where someone has posted the exact image I need to complete a picture.
I Didn’t Strip the Paint Off the Bike Frame Just Yet
I held off stripping the bike down for painting until I was sure I had captured all I needed for making new decals. I often don’t know that I have everything I need until after I am done or nearly done making the new decals. This project was no exception.
Getting the Photos and Scans to Where I Need Them
How you do this will depend on the tools you use, but I took the photos with my phone camera and saved them to cloud storage. I accessed cloud storage from my PC and downloaded the photos I needed into the project folder. I saved scans to that same folder as I made them.
I took measurements of the height and width of the original decals, and of where they are positioned on the frame tubes. I used a cloth measuring tape for measurements around the curvature of frame tubes.
A measurement of the dimension of the decal that wraps around the tube is useful because a straight-on photo takes the curve out of the decal. It will look shorter (or narrower) in the photo than it really is. So, If I have drawn the new decal over a photo of it in my drawing software, I will stretch it to the correct height (or width) when I’m finished, based on the measurement.
The distortion in the photo of the curve isn’t linear, so stretching it doesn’t correct it exactly as it should. But we’re usually talking about a small amount of stretching, so it works reasonably well.
I also took photos with a ruler in them to capture the size or position of a decal along a tube. This is valuable reference for making and printing the new decals, and for getting them positioned where they originally were on the bike frame.
Other Sources of Reference Information for Decals
The decals on this bike were all in good shape, so they provided good reference sources. I had projects in the past where big chunks of a decal had been scraped off. In those cases, I had good luck with image searches online and then importing relevant images into my drawing software for reference. I could, for instance, search for “Trek logo.”
I have also searched for high-resolution pictures of bikes that had the same decals as what I’m trying to recreate. I sometimes hit the jackpot where someone has posted the exact image I need to complete a picture.
I Didn’t Strip the Paint Off the Bike Frame Just Yet
I held off stripping the bike down for painting until I was sure I had captured all I needed for making new decals. I often don’t know that I have everything I need until after I am done or nearly done making the new decals. This project was no exception.
Getting the Photos and Scans to Where I Need Them
How you do this will depend on the tools you use, but I took the photos with my phone camera and saved them to cloud storage. I accessed cloud storage from my PC and downloaded the photos I needed into the project folder. I saved scans to that same folder as I made them.
__________________
Living life on the small chainring.
Living life on the small chainring.
Last edited by daywood; 09-11-24 at 05:04 PM.
09-11-24, 04:20 PM
#4
Member
Thread Starter
Getting Started with the Graphics Software to Draw New Decals
When I felt I had enough detail to start developing the new decals, I opened a project in my graphics program and started importing the image files I needed to develop one of the decals.
There are several options for graphic design software, so I�ll try to generally describe operations I believe are common across tools. DM me if you would like to know more about what I use.
What I�ve found I need in my graphics software are the abilities to:
- Draw, edit, and fill freeform polygons.
- Edit the width, color, and end connector shapes of lines.
- Create and fill predefined shapes, such as circles and rectangles.
- Flip and variably rotate objects.
- Fill objects with gradients; that is, create fills that blend from one color to another and allow me to control where the transition occurs.
- Manipulate objects I�ve created into layers so I can build up the finished image from parts of it I have drawn separately, and so I can draw over the top of imported images.
- Import and re-size photos I�ve taken as well as scans and other images for reference.
- Clone colors from imported images to use in the decal I�m creating.
- Export JPG or PNG images of my designs for printing. In this project, I needed JPG or PNG to import into the software on my plotting cutter. If I was not using a plotting cutter, I would import the image files into presentation or document editing software (or anything that can arrange and size graphics), size the images correctly there, and then send them to my printer.
__________________
Living life on the small chainring.
Living life on the small chainring.
09-11-24, 04:28 PM
#5
Member
Thread Starter
Creating the Seat Tube Decal
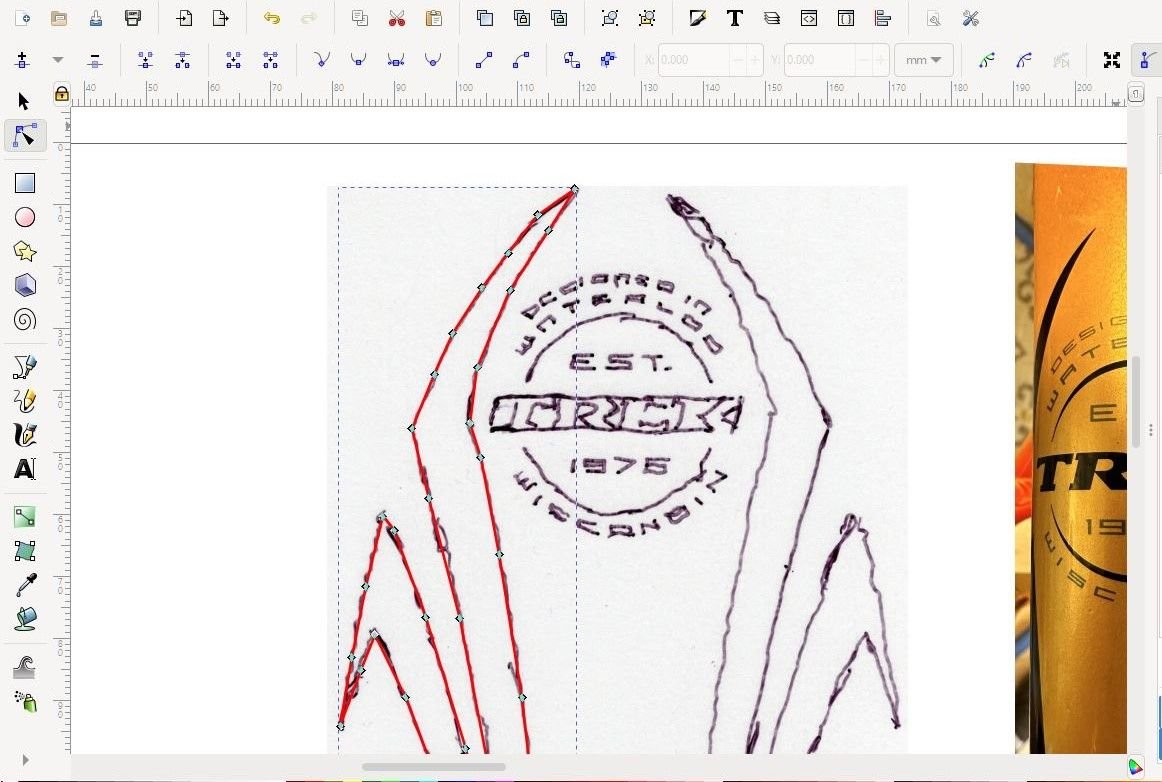
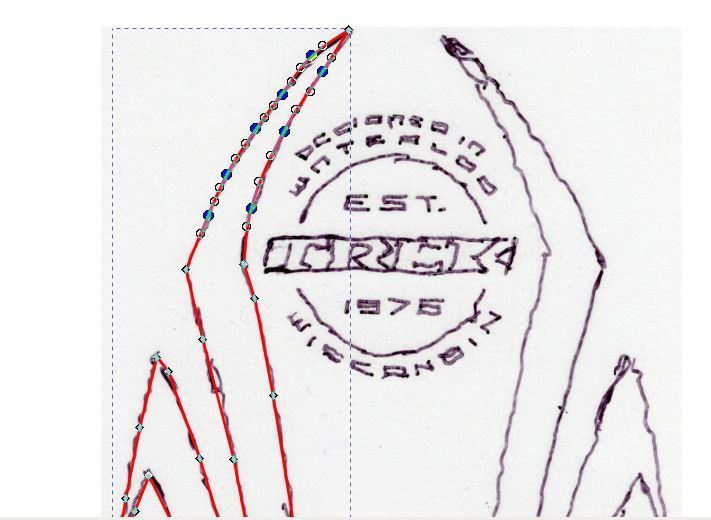
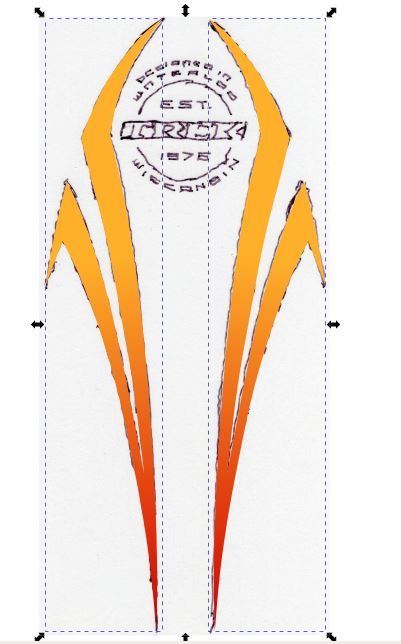
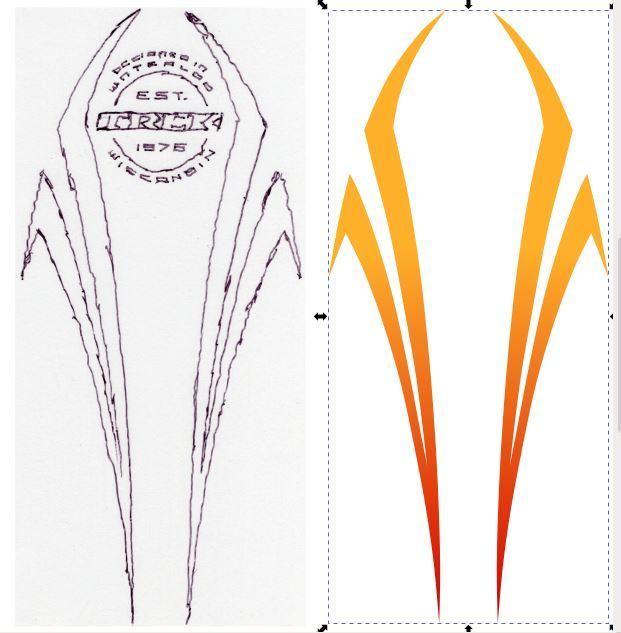
Drawing the Decal. I imported the image of my tracing into my graphics program and sized it to fit within the workspace.
I then used the freeform polygon tool to start tracing the sketch. With the freeform tool, I could draw along the lines of the decal in the photo, making a series of nodes (connecting points) as I went that would allow me to edit the shape of my drawn image later. That is, as I followed the shape of the sketch with my mouse, I clicked the mouse button occasionally to make a new node along the line I was making.
When I got back around to where I started drawing, I clicked on the node that marked the beginning of the shape, which caused the shape to became an enclosed polygon; that is, I could fill it with a color, or size or rotate it, like other shapes.
From trial and error, I�ve developed a feel for how many nodes I�ll need along curved portions of polygons to make a smooth curve. But if I found I had created too many or two few nodes, I could subtract or add nodes anywhere I want in the shape to make it work like I wanted.
I changed the line color in my drawn polygon to red so I could see it better on top of the black lines in the underlying sketch.
On this decal, one half is a mirror of the other, so I only had to draw one side of it.
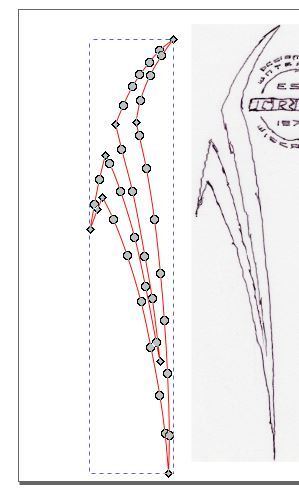
Fine-Tuning the Shape. After I completed the polygon, I took a first pass at fine-tuning the shape of it by changing the nodes along the curved bits to auto-smoothing nodes, which helped create more of a smooth arc shape.
I left nodes as normal or end-point type where I needed straight lines or corners, and I moved them if necessary to better align with the shape of the sketch. Again, this is something I have developed a feel for and something that just takes a little practice.
After I had it looking pretty good, I moved the sketch out of view in my workspace so I could see only the shape I had created. Then I tweaked the position of any of the nodes that were keeping the sides of the shape from being smooth or otherwise shaped as they should have been.
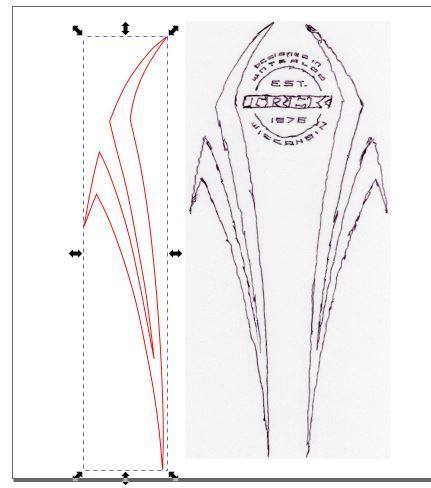
Filling the Shape with Color. Now it was time to fill the shape. I decided to honor the frame�s original paint colors in the fill colors I used for the decals. To mimic the burst effect in the original paint scheme, I decided the decals would be filled with a gradient from mandarin red to orange. Had I just duplicated the original decal, though, I would have filled the shape with black.
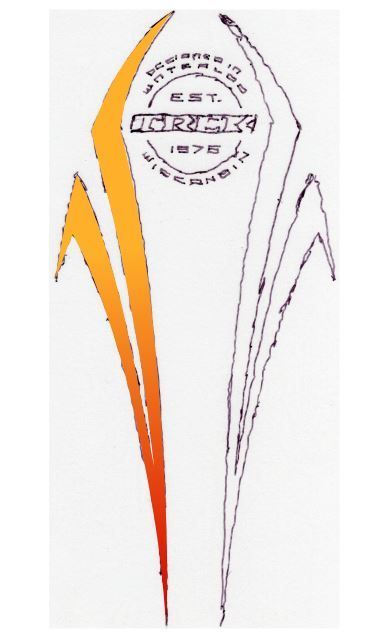
Mirroring and Positioning the Two Sides of the Decal. Now that I had one side done, I brought the reference sketch back into view and positioned it exactly under the shape I drew. I then duplicated the shape, flipped the duplicate horizontally, and positioned it on the sketch so it mirrored the other one.
I used the alignment tool in my graphics software to align the tops of the two shapes so they were perfectly aligned vertically.
Now that they were finished and positioned where they needed to be, I used the Group function of my software to bind them together. I then moved them aside, leaving the sketch in place so I could begin laying out the text medallion that was in the center area.
Drawing the Decal. I imported the image of my tracing into my graphics program and sized it to fit within the workspace.
I then used the freeform polygon tool to start tracing the sketch. With the freeform tool, I could draw along the lines of the decal in the photo, making a series of nodes (connecting points) as I went that would allow me to edit the shape of my drawn image later. That is, as I followed the shape of the sketch with my mouse, I clicked the mouse button occasionally to make a new node along the line I was making.
When I got back around to where I started drawing, I clicked on the node that marked the beginning of the shape, which caused the shape to became an enclosed polygon; that is, I could fill it with a color, or size or rotate it, like other shapes.
From trial and error, I�ve developed a feel for how many nodes I�ll need along curved portions of polygons to make a smooth curve. But if I found I had created too many or two few nodes, I could subtract or add nodes anywhere I want in the shape to make it work like I wanted.
I changed the line color in my drawn polygon to red so I could see it better on top of the black lines in the underlying sketch.
On this decal, one half is a mirror of the other, so I only had to draw one side of it.
Fine-Tuning the Shape. After I completed the polygon, I took a first pass at fine-tuning the shape of it by changing the nodes along the curved bits to auto-smoothing nodes, which helped create more of a smooth arc shape.
I left nodes as normal or end-point type where I needed straight lines or corners, and I moved them if necessary to better align with the shape of the sketch. Again, this is something I have developed a feel for and something that just takes a little practice.
After I had it looking pretty good, I moved the sketch out of view in my workspace so I could see only the shape I had created. Then I tweaked the position of any of the nodes that were keeping the sides of the shape from being smooth or otherwise shaped as they should have been.
Filling the Shape with Color. Now it was time to fill the shape. I decided to honor the frame�s original paint colors in the fill colors I used for the decals. To mimic the burst effect in the original paint scheme, I decided the decals would be filled with a gradient from mandarin red to orange. Had I just duplicated the original decal, though, I would have filled the shape with black.
Mirroring and Positioning the Two Sides of the Decal. Now that I had one side done, I brought the reference sketch back into view and positioned it exactly under the shape I drew. I then duplicated the shape, flipped the duplicate horizontally, and positioned it on the sketch so it mirrored the other one.
I used the alignment tool in my graphics software to align the tops of the two shapes so they were perfectly aligned vertically.
Now that they were finished and positioned where they needed to be, I used the Group function of my software to bind them together. I then moved them aside, leaving the sketch in place so I could begin laying out the text medallion that was in the center area.
__________________
Living life on the small chainring.
Living life on the small chainring.
09-11-24, 04:30 PM
#6
Member
Thread Starter
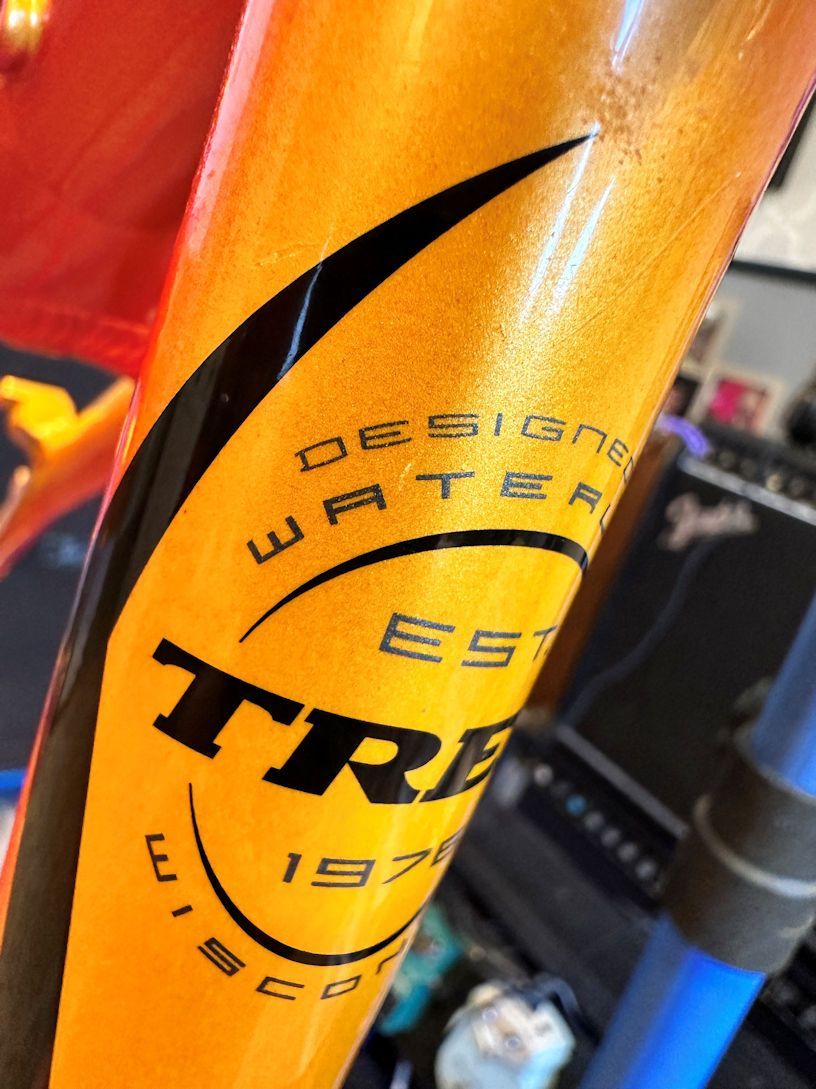
Laying out the Medallion Area.
I treated the medallion in the middle portion of the decal as a separate decal because I would be printing it on clear self-adhesive vinyl. All elements of it would be printed black, which would stand out well against the aluminum color of the tube. I would be using white self-adhesive vinyl to print the swervy-curvy part of the decal so the colors would come out the way I wanted them.
I imported photos I had taken of various aspects of the medallion. I would need them for determining the size and position of its components.
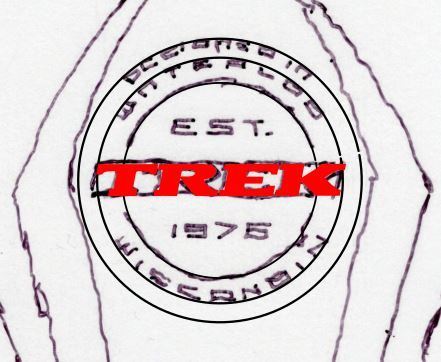
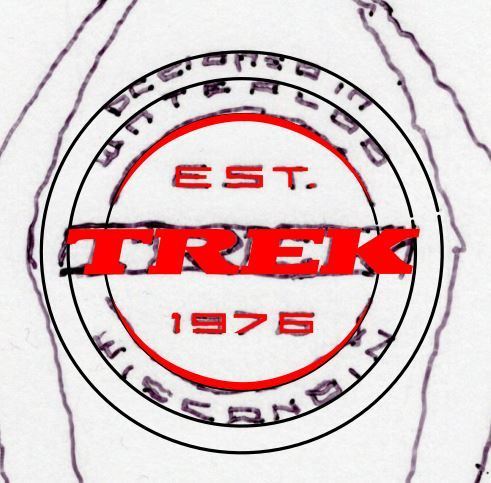
Looking at how the medallion was laid out, I could see that the designer used concentric circles. So, I created a set of concentric circles, sizing and positioning them on top of the sketch to use as guides for developing the content of the medallion. This is something that would have been more difficult to recreate had I been working only with photos; that is, without the sketch.

The Trek Logo. This one was easy because I already had a Trek logo I had created for a past project. It was made the same way I made the shapes in this decal. I made it for a down tube on that earlier project, and I would use it again the same way on this project. But I could also resize it and use it as the Trek logo in this medallion.
I fiddled with the size and position of the logo until it lined up correctly on the sketch, and then I filled it with red so it would stand out.
I treated the medallion in the middle portion of the decal as a separate decal because I would be printing it on clear self-adhesive vinyl. All elements of it would be printed black, which would stand out well against the aluminum color of the tube. I would be using white self-adhesive vinyl to print the swervy-curvy part of the decal so the colors would come out the way I wanted them.
I imported photos I had taken of various aspects of the medallion. I would need them for determining the size and position of its components.
Looking at how the medallion was laid out, I could see that the designer used concentric circles. So, I created a set of concentric circles, sizing and positioning them on top of the sketch to use as guides for developing the content of the medallion. This is something that would have been more difficult to recreate had I been working only with photos; that is, without the sketch.
The Trek Logo. This one was easy because I already had a Trek logo I had created for a past project. It was made the same way I made the shapes in this decal. I made it for a down tube on that earlier project, and I would use it again the same way on this project. But I could also resize it and use it as the Trek logo in this medallion.
I fiddled with the size and position of the logo until it lined up correctly on the sketch, and then I filled it with red so it would stand out.
__________________
Living life on the small chainring.
Living life on the small chainring.
09-11-24, 04:32 PM
#7
Member
Thread Starter
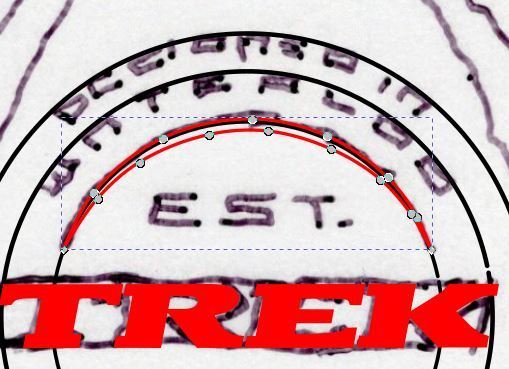
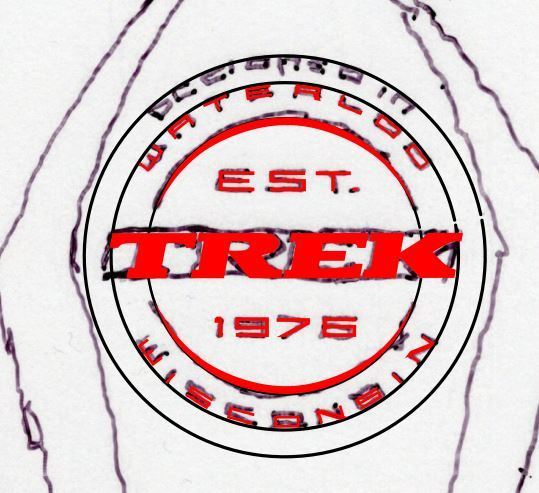
The Eyebrows. Next, I created the eyebrow arcs above and below the Trek logo by creating polygons and manipulating the nodes until they were shaped like the originals. Since they were mirror images, I only had to create one, fill it in red, duplicate it, flip the duplicate vertically, and line the two of them up with the sketch and with each other.
__________________
Living life on the small chainring.
Living life on the small chainring.
09-11-24, 04:37 PM
#8
Member
Thread Starter
Creating the Text Characters
This is my favorite part of these projects. But it�s fiddly work, and it may not appeal to everyone.
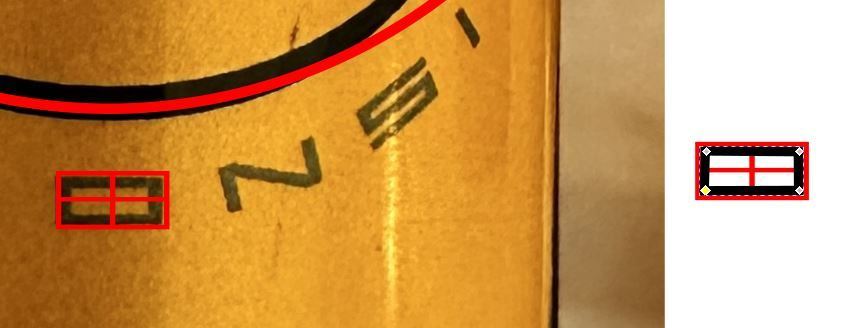
Larger Text in the Center. I started with the characters located directly above and below the Trek logo. I studied the photos and noted that they are block characters with the horizontal crossings centered vertically. They were made almost entirely of lines rather than of polygons. These are the easiest kinds of characters to make.
I chose one of the characters that was in the horizontal center of a photo to use as my guide for the size and shape of all the characters. It was the least distorted by the curvature of the tube. Using that character, I constructed a grid to use for developing all the characters in that group.
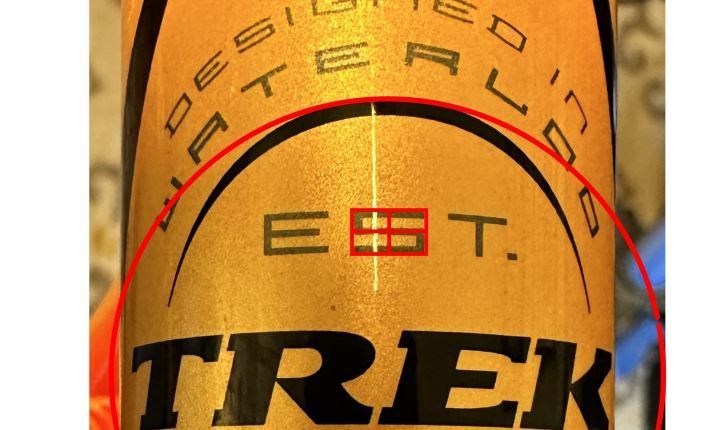
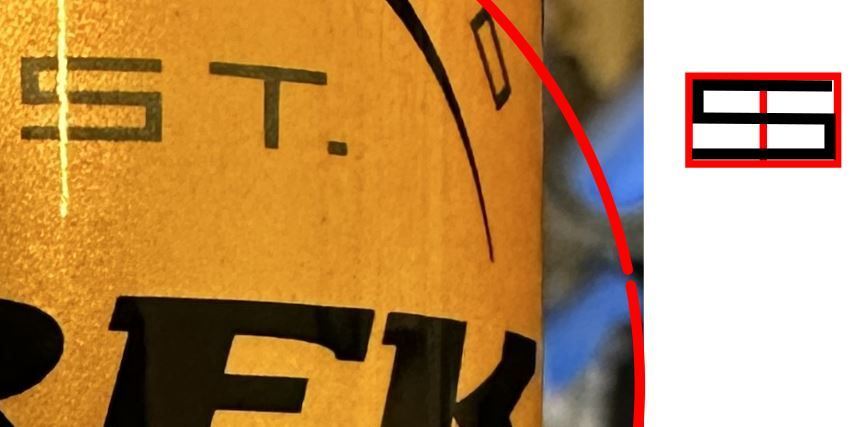
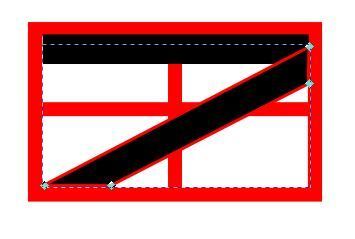
I could construct most character elements from lines, but the way the diagonal in the �7� was done in the original required that I create and fill a parallelogram of the same width as the horizontal and vertical lines.
After I finished making each character, I grouped all its components so I could position and rotate it later without messing it up.
After I made all the unique characters I needed for that area of the medallion, and after I duplicated the ones that I needed more than once, I began moving them into place over the sketch.
I did this by positioning them where they needed to be horizontally, and then using the alignment tool to make sure the bottoms of the characters were aligned with each other vertically.
Once I got them where I wanted them, I grouped them so I wouldn�t accidentally move any of them out of place later.
This is my favorite part of these projects. But it�s fiddly work, and it may not appeal to everyone.
Larger Text in the Center. I started with the characters located directly above and below the Trek logo. I studied the photos and noted that they are block characters with the horizontal crossings centered vertically. They were made almost entirely of lines rather than of polygons. These are the easiest kinds of characters to make.
I chose one of the characters that was in the horizontal center of a photo to use as my guide for the size and shape of all the characters. It was the least distorted by the curvature of the tube. Using that character, I constructed a grid to use for developing all the characters in that group.
I could construct most character elements from lines, but the way the diagonal in the �7� was done in the original required that I create and fill a parallelogram of the same width as the horizontal and vertical lines.
After I finished making each character, I grouped all its components so I could position and rotate it later without messing it up.
After I made all the unique characters I needed for that area of the medallion, and after I duplicated the ones that I needed more than once, I began moving them into place over the sketch.
I did this by positioning them where they needed to be horizontally, and then using the alignment tool to make sure the bottoms of the characters were aligned with each other vertically.
Once I got them where I wanted them, I grouped them so I wouldn�t accidentally move any of them out of place later.
__________________
Living life on the small chainring.
Living life on the small chainring.
09-11-24, 04:41 PM
#9
Member
Thread Starter
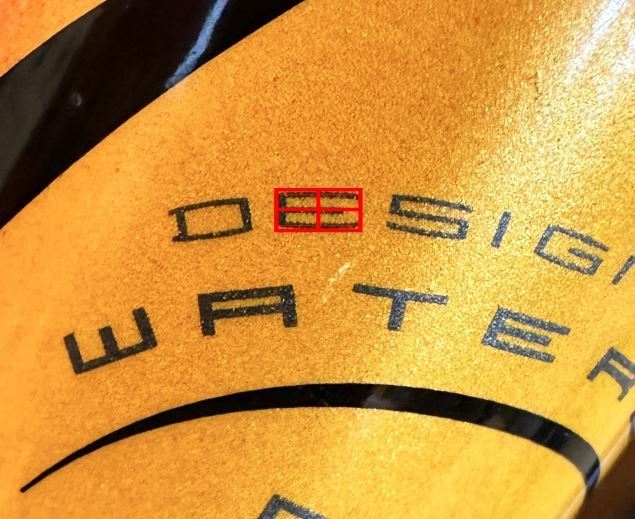
The Text Along the Inner Circle. Studying the originals, I saw that these characters were also block, like the ones I just created, so I approached them the same way.
Using as reference my imported photo that was scaled to match the actual size of the decal on the bike, I made a version of the character layout grid that was the correct size for these new characters.
I then created the characters, selecting a line weight that matched the original, and making sure to group the elements of any character that had multiple elements (lines).
As before, when I had all the unique characters I needed, I duplicated the ones that I needed multiples of, and I began laying them out along the layout circle. I used the rotate function of my software to orient them to follow the curve of the circle. I temporarily changed the line colors to red to make it easier to see where the characters were relative to the sketch.
When finished, I grouped the set of characters so I wouldn�t accidentally move one out of place when fiddling with something else.
__________________
Living life on the small chainring.
Living life on the small chainring.
09-11-24, 04:44 PM
#10
Member
Thread Starter
Smallest Text Along the Outer Circle. I saw in the photo that the characters across the top were not only smaller, but they introduced curved lines at the top and bottom of each character. Otherwise, though, they were block characters like the others.
In this case, I created a version of the character layout grid that had additional reference lines for how much the lines curved, and which was sized for the characters in the reference photo.
Using the grid and the freeform polygon tool, I laid out all the unique characters I would need, creating curved lines instead of straight lines along the bottom and top. I used the node editing tool to change the nodes along the curves to auto-smooth, and then repositioned the nodes if necessary to make the overall arc of the line section look smooth.

Note that it�s possible, and I have a tendency, to fiddle with these more than necessary. It�s probably good to remember that they are very small characters in a hard-to-see part of the bike frame.
As with the other characters, when I had all the unique ones I needed, I duplicated those that I needed multiples of, and I began laying them out along the outer layout circle. I rotated them as necessary to follow the curve of the circle. And I grouped the set of them as I had previously done to keep them safe.
Completing the Medallion. At this point I had created all the elements of the medallion. I changed the lines to black, grouped the medallion elements together and moved the medallion off the sketch so I could critique it standing on its own. If anything needed a minor adjustment, I ungrouped everything and made the adjustment where it was needed. When I was satisfied, I re-grouped everything in the medallion.

In this case, I created a version of the character layout grid that had additional reference lines for how much the lines curved, and which was sized for the characters in the reference photo.
Using the grid and the freeform polygon tool, I laid out all the unique characters I would need, creating curved lines instead of straight lines along the bottom and top. I used the node editing tool to change the nodes along the curves to auto-smooth, and then repositioned the nodes if necessary to make the overall arc of the line section look smooth.
Note that it�s possible, and I have a tendency, to fiddle with these more than necessary. It�s probably good to remember that they are very small characters in a hard-to-see part of the bike frame.
As with the other characters, when I had all the unique ones I needed, I duplicated those that I needed multiples of, and I began laying them out along the outer layout circle. I rotated them as necessary to follow the curve of the circle. And I grouped the set of them as I had previously done to keep them safe.
Completing the Medallion. At this point I had created all the elements of the medallion. I changed the lines to black, grouped the medallion elements together and moved the medallion off the sketch so I could critique it standing on its own. If anything needed a minor adjustment, I ungrouped everything and made the adjustment where it was needed. When I was satisfied, I re-grouped everything in the medallion.
__________________
Living life on the small chainring.
Living life on the small chainring.
09-11-24, 04:48 PM
#11
Member
Thread Starter
Creating Image Files for Printing and Cutting
Once I had finished drawing all the new decals, I had to get them into a format that I could import into my plotting cutter. My graphics software lets me export in a variety of file types.
As I normally do, I used PNG (Portable Network Graphics), a raster image format. I have found that 600 dots per inch is a good compromise setting for the resolution of the exported images: It�s good enough for sharp printed images and yet the files are not overly large.
In the case of the decal I have been developing in these examples, I made separate image files for the medallion and for the swervy-curvy part of it. That way, I could combine them later into a single print image if I wanted to print them onto the same media, or I could print them separately on different kinds of media, which is what I chose to do on this project.
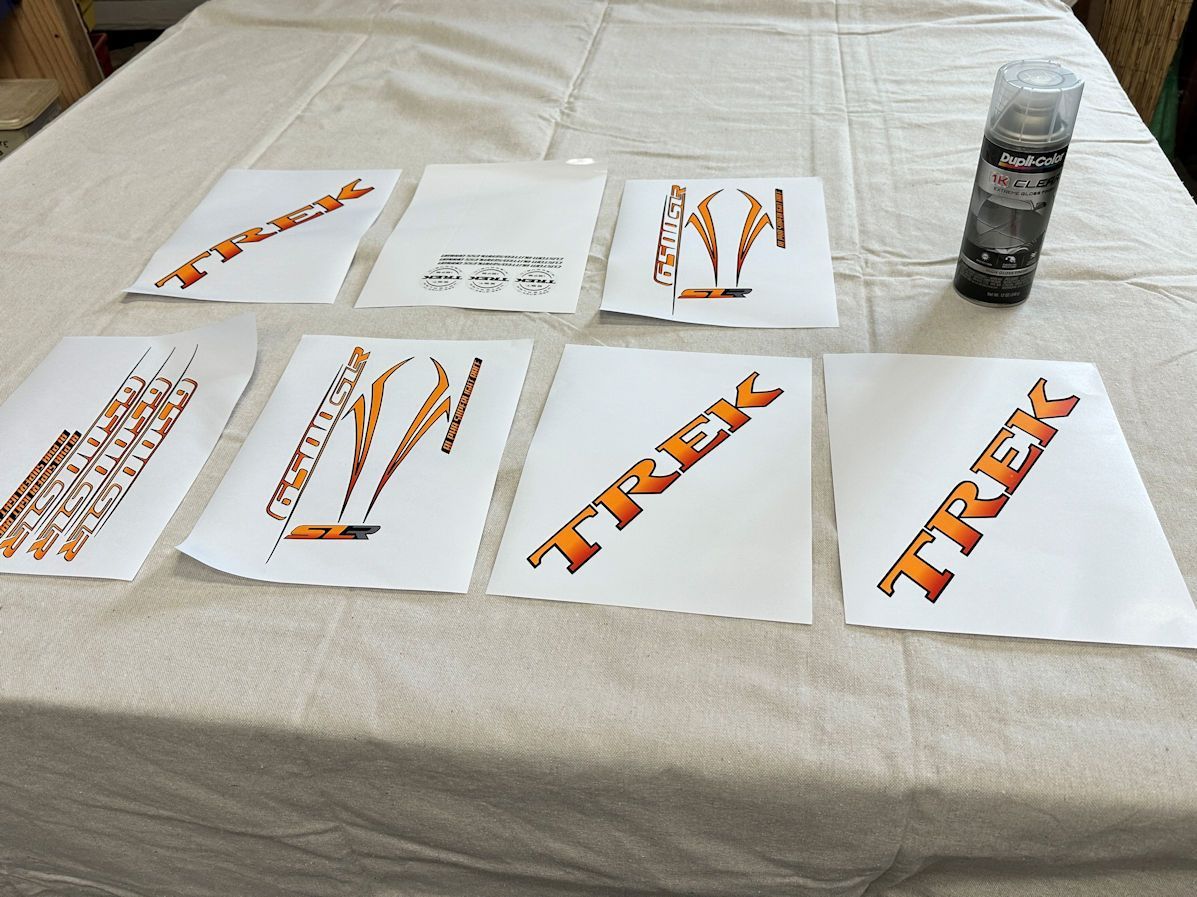
Printing and Cutting the Decals
I apologize that the following illustrations for printing and applying the decals use a different decal than the one I just described how to create. The process would be the same for either, though.
Printing. I use a printer that prints with pigment-based ink. Pigment-based inks are fade resistant. Most home inkjet printers use dye-based inks. Unfortunately, dye-based inks fade very quickly.
I found my printer by searching online for �pigment based ink printers.� DM me if you want to know more about the printer I use.
Cutting. I used my plotting cutter for this project. DM me if you�d like to know more about which plotting cutter I use and why.
The basic process with the plotting cutter was:
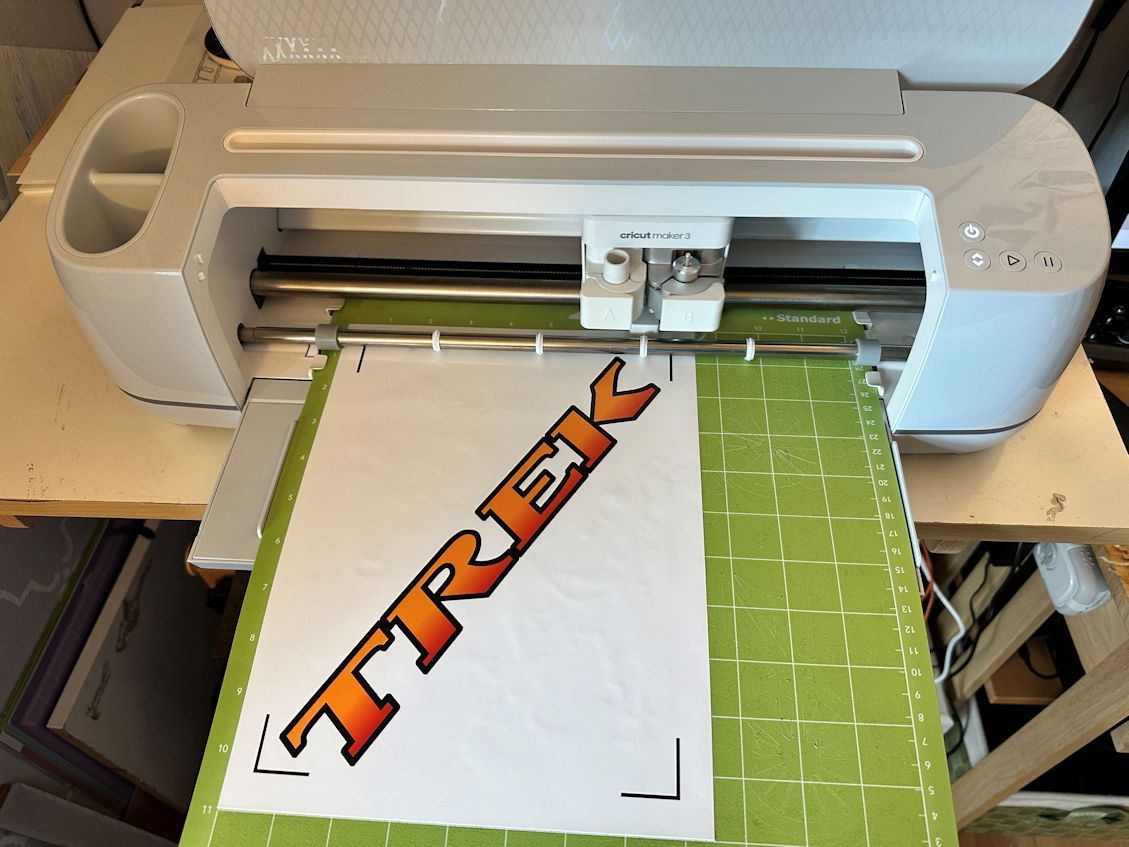
1. I imported my graphic image files into the plotting cutter and organized them in its layout software.
2. The plotting cutter added registration marks, stored a mapping of the outlines of my images, and sent a print file to my printer, where I had loaded the decal paper.
3. I attached the printed sheet (self-stick vinyl for this project) to a cutting mat and fed it into the plotting cutter, which then precision cut my decals based on the mapping it stored earlier. It only cut through the vinyl and not the backing.
4. Once cut, I removed all parts of the sheet that were not my decals, like Michelangelo removed all the marble that didn�t look like David.
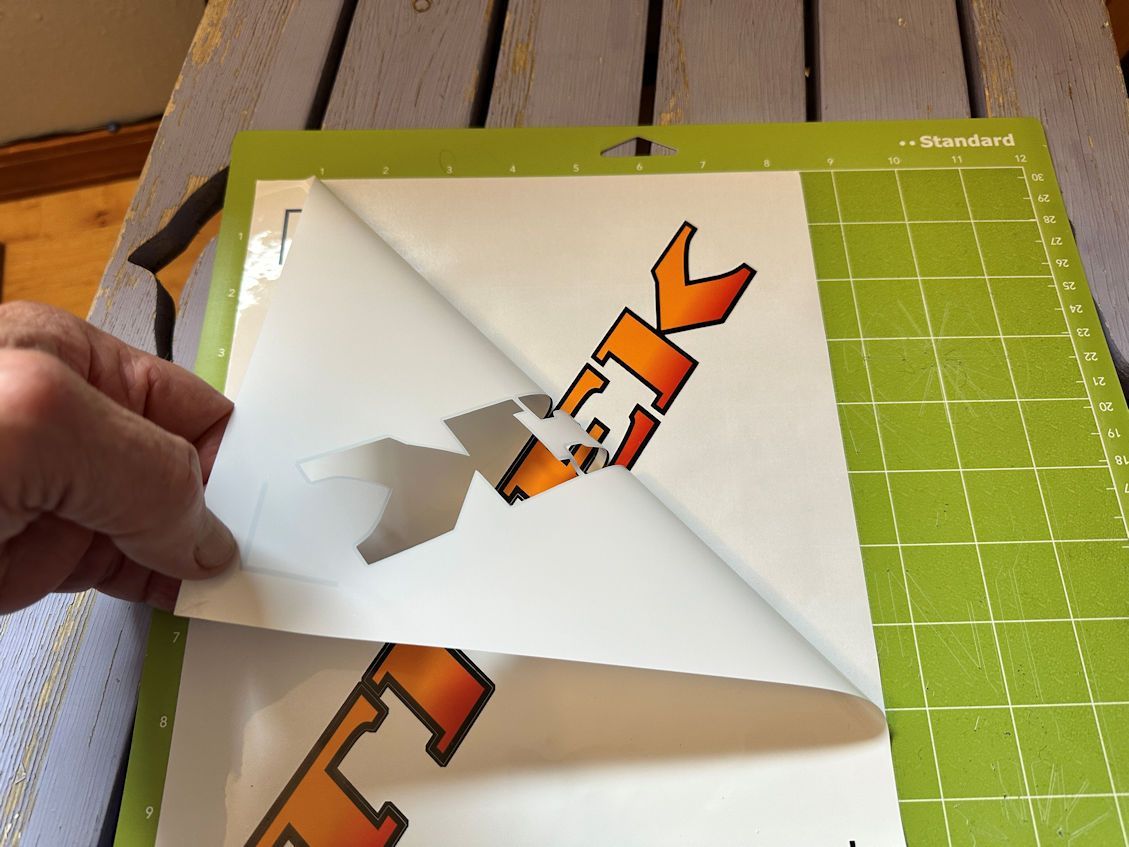
You do not need a plotting cutter if you are handy with an Xacto knife. I created vinyl decals before I had the plotting cutter, and I cut them myself with an Xacto knife after I had applied them to the bike. For instance, I cut these in the photos by hand, mostly on the bike frame.
Once I had finished drawing all the new decals, I had to get them into a format that I could import into my plotting cutter. My graphics software lets me export in a variety of file types.
As I normally do, I used PNG (Portable Network Graphics), a raster image format. I have found that 600 dots per inch is a good compromise setting for the resolution of the exported images: It�s good enough for sharp printed images and yet the files are not overly large.
In the case of the decal I have been developing in these examples, I made separate image files for the medallion and for the swervy-curvy part of it. That way, I could combine them later into a single print image if I wanted to print them onto the same media, or I could print them separately on different kinds of media, which is what I chose to do on this project.
Printing and Cutting the Decals
I apologize that the following illustrations for printing and applying the decals use a different decal than the one I just described how to create. The process would be the same for either, though.
Printing. I use a printer that prints with pigment-based ink. Pigment-based inks are fade resistant. Most home inkjet printers use dye-based inks. Unfortunately, dye-based inks fade very quickly.
I found my printer by searching online for �pigment based ink printers.� DM me if you want to know more about the printer I use.
Cutting. I used my plotting cutter for this project. DM me if you�d like to know more about which plotting cutter I use and why.
The basic process with the plotting cutter was:
1. I imported my graphic image files into the plotting cutter and organized them in its layout software.
2. The plotting cutter added registration marks, stored a mapping of the outlines of my images, and sent a print file to my printer, where I had loaded the decal paper.
3. I attached the printed sheet (self-stick vinyl for this project) to a cutting mat and fed it into the plotting cutter, which then precision cut my decals based on the mapping it stored earlier. It only cut through the vinyl and not the backing.
4. Once cut, I removed all parts of the sheet that were not my decals, like Michelangelo removed all the marble that didn�t look like David.
You do not need a plotting cutter if you are handy with an Xacto knife. I created vinyl decals before I had the plotting cutter, and I cut them myself with an Xacto knife after I had applied them to the bike. For instance, I cut these in the photos by hand, mostly on the bike frame.
__________________
Living life on the small chainring.
Living life on the small chainring.
Likes For daywood:
09-11-24, 04:50 PM
#12
Member
Thread Starter
Transferring the Decals
In the next steps, I used transfer tape to lift the decals off the backing sheet. This kept elements of the decals aligned with each other as I stuck them onto the bike tubes.
Transfer tape is clear tape with adhesive that has less tack than the adhesive on the vinyl decal. It adheres enough to the decals to lift them off their backing and to keep them organized, but once you have attached the decals to the bike frame, you can remove the transfer tape without pulling the decals off the frame.
I found I had to spray a clear coat on the decals and let them dry before applying the transfer tape. Otherwise, the transfer tape lifted the top layer of ink from the decals, leaving a funky color and finish.
I put masking tape on the bike tubes to help me get the decals positioned where they should be on the tubes and aligned correctly.
Once the clear coat was dry, I applied the transfer tape onto the decal while the decal was still sitting on its backing sheet, and while the backing sheet was still attached to the cutting mat. I then used the transfer tape to lift the decal off the backing. The tape kept the decal perfectly straight and all the pieces correctly located relative to the others as I moved the decal to the bike frame.
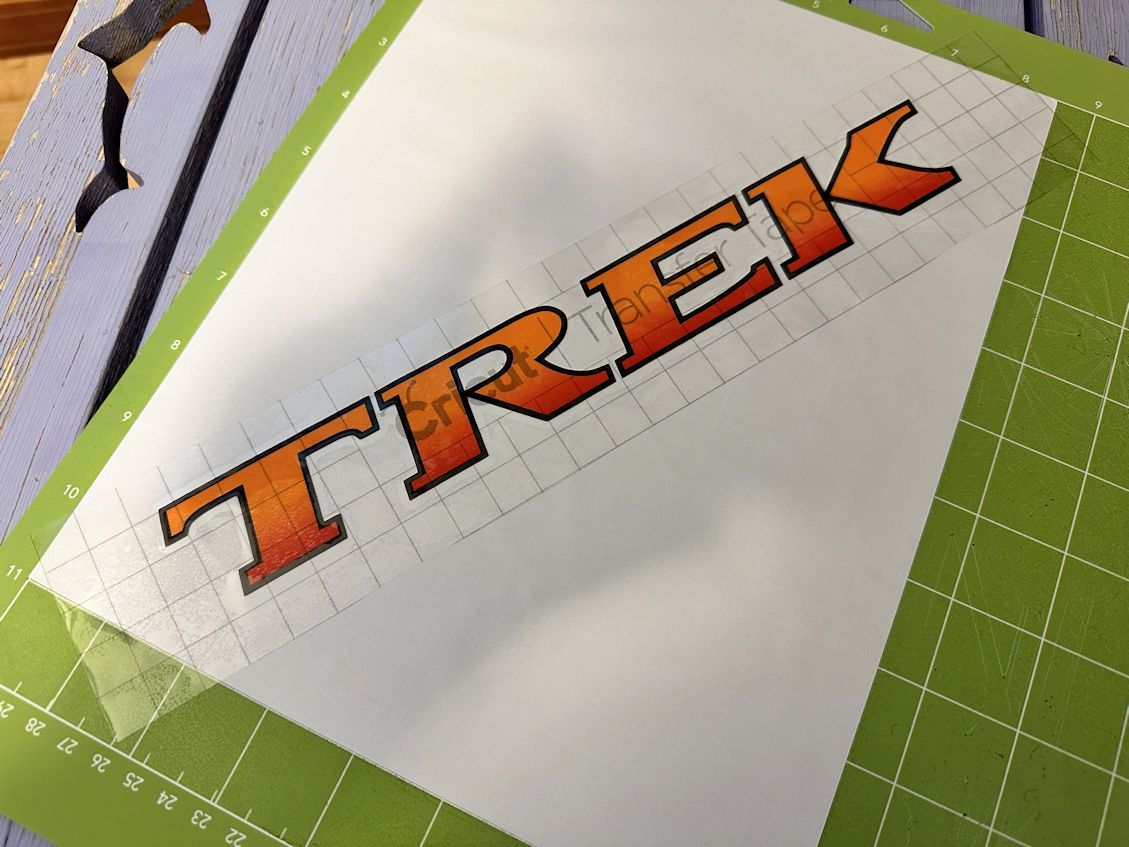
Once the decal was lifted on the transfer tape, I carefully set it down in the correct alignment and gently rubbed it onto the tubes. I say gently because if the decal adheres too strongly to the transfer tape, it will be difficult to remove the transfer tape from it. I then carefully peeled back the transfer tape to remove it. After that I more thoroughly pressed the decal onto the tube.

In the next steps, I used transfer tape to lift the decals off the backing sheet. This kept elements of the decals aligned with each other as I stuck them onto the bike tubes.
Transfer tape is clear tape with adhesive that has less tack than the adhesive on the vinyl decal. It adheres enough to the decals to lift them off their backing and to keep them organized, but once you have attached the decals to the bike frame, you can remove the transfer tape without pulling the decals off the frame.
I found I had to spray a clear coat on the decals and let them dry before applying the transfer tape. Otherwise, the transfer tape lifted the top layer of ink from the decals, leaving a funky color and finish.
I put masking tape on the bike tubes to help me get the decals positioned where they should be on the tubes and aligned correctly.
Once the clear coat was dry, I applied the transfer tape onto the decal while the decal was still sitting on its backing sheet, and while the backing sheet was still attached to the cutting mat. I then used the transfer tape to lift the decal off the backing. The tape kept the decal perfectly straight and all the pieces correctly located relative to the others as I moved the decal to the bike frame.
Once the decal was lifted on the transfer tape, I carefully set it down in the correct alignment and gently rubbed it onto the tubes. I say gently because if the decal adheres too strongly to the transfer tape, it will be difficult to remove the transfer tape from it. I then carefully peeled back the transfer tape to remove it. After that I more thoroughly pressed the decal onto the tube.
__________________
Living life on the small chainring.
Living life on the small chainring.
09-11-24, 04:52 PM
#13
Member
Thread Starter
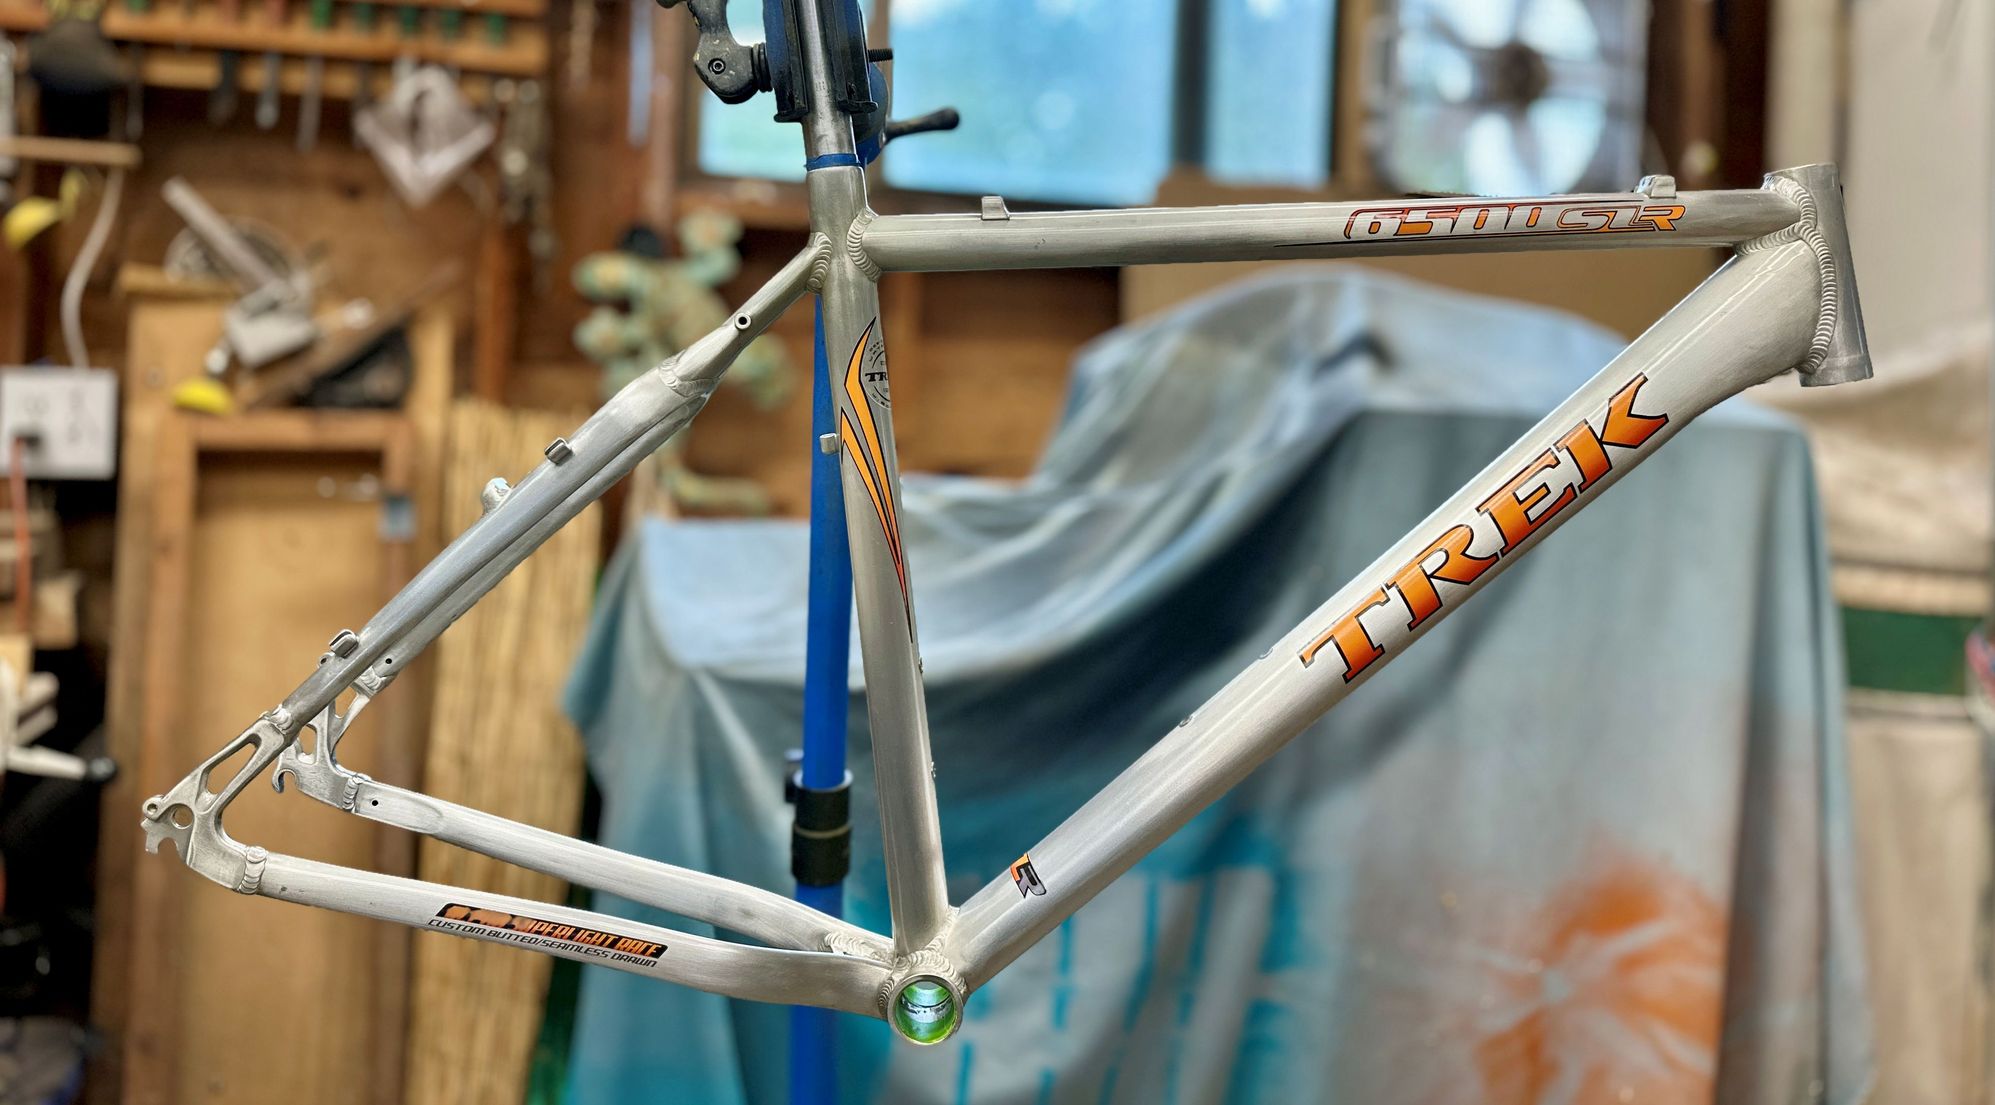
To Topcoat or Not to Topcoat
After I had all the decals applied, I applied two coats of clear topcoat to the entire frame. It protects the decals from abrasion, gives them UV protection, and helps them blend better with the overall finish.
Here�s how this project turned out after all the decals were applied, followed by two coats of automotive 1K clear coat.
There have only been two times I�ve not top coated decals after I applied them, and both of those were slide-on decals.
Once was because the supplier of the new old stock decals I purchased recommended against it, probably because of the possibility that a new clear coat formula would not be compatible with whatever finish the manufacturer used on the decals.
The other was because . . . I don�t know why I did it and it didn�t turn out well. Slide-on decals are relatively fragile and the first time I carried my bike on the carrier behind my RV, all the bouncing around caused the carrier�s hold-down arm to rub part of the lettering off the top tube.
Which Clear Coat? I have been using 1K (one-part) automotive clear coats for the past couple of years because I decided I want to live. I used 2K base coats and clear coats that contained urethane as a hardener in the past, but I found myself taking lots of measures to protect myself from the urethane, which is toxic, and I still worried whether I had done enough. As this is a hobby, I found myself questioning the wisdom of that. I also found that over time, a 1K automotive clear coat dries to a reasonably hard consistency, certainly hard enough for the simple life most of my bikes enjoy.
__________________
Living life on the small chainring.
Living life on the small chainring.
09-11-24, 04:56 PM
#14
Member
Thread Starter
Additional Thoughts about Decal Media
Which decal media I use depends on the color of the bike and the nature of the decal. The major thing I must consider is that I cannot print the color white. Home printers are 3-color printers. 4-color printers introduce white as the fourth color. As you probably know, home printers use the white of the print media to provide the white component of printed colors and for fields of white.
If I am printing on clear media, and I’m not printing all in black, the printer is counting on the color of the surface beneath the decal to provide the white. If that surface isn’t white, the printed colors will be modified by whatever color it is. Moreover, light printed colors won’t show up much at all on a dark-colored surface. Those cases are good candidates for white self-adhesive vinyl or white slide-on decals.
Decal Media Options I’m Familiar With
Clear glossy slide-on decal paper: I’ve found this works best for decals that are black or other very dark colors.
However, I have found I can create interesting effects with clear slide-on decals by purposely letting the underlying paint or metal blend with a semitransparent color in the decal to add texture or color.
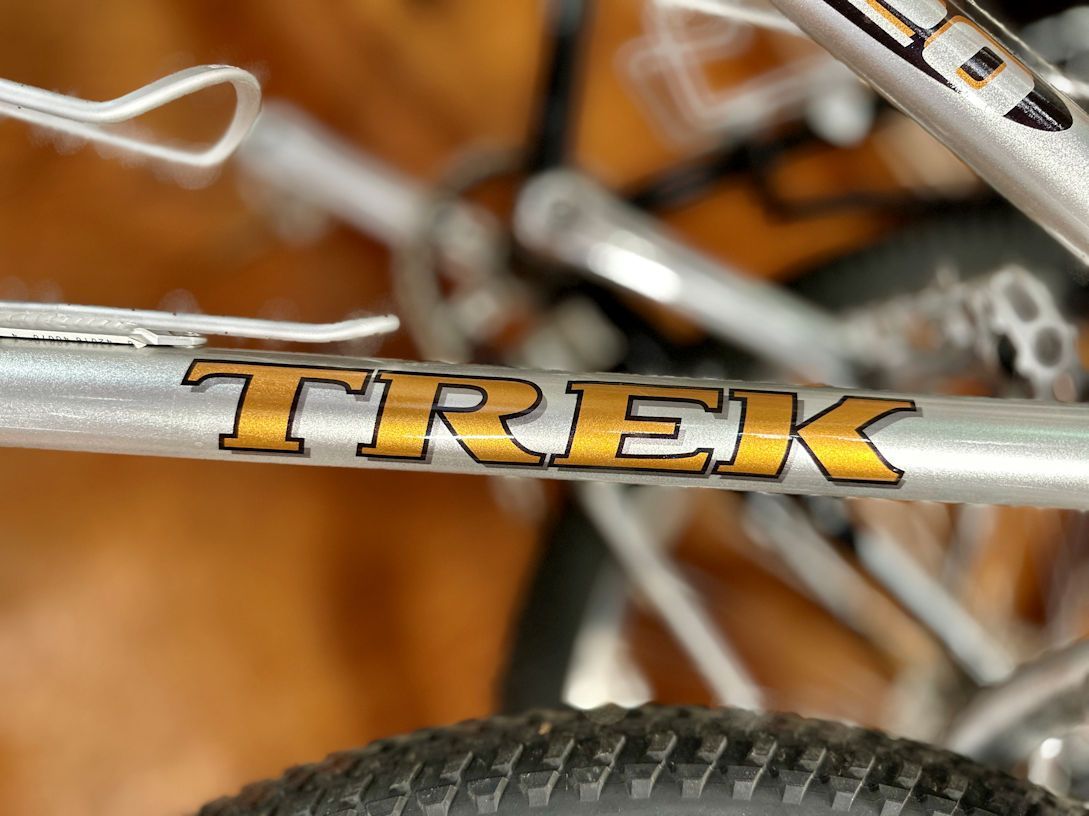
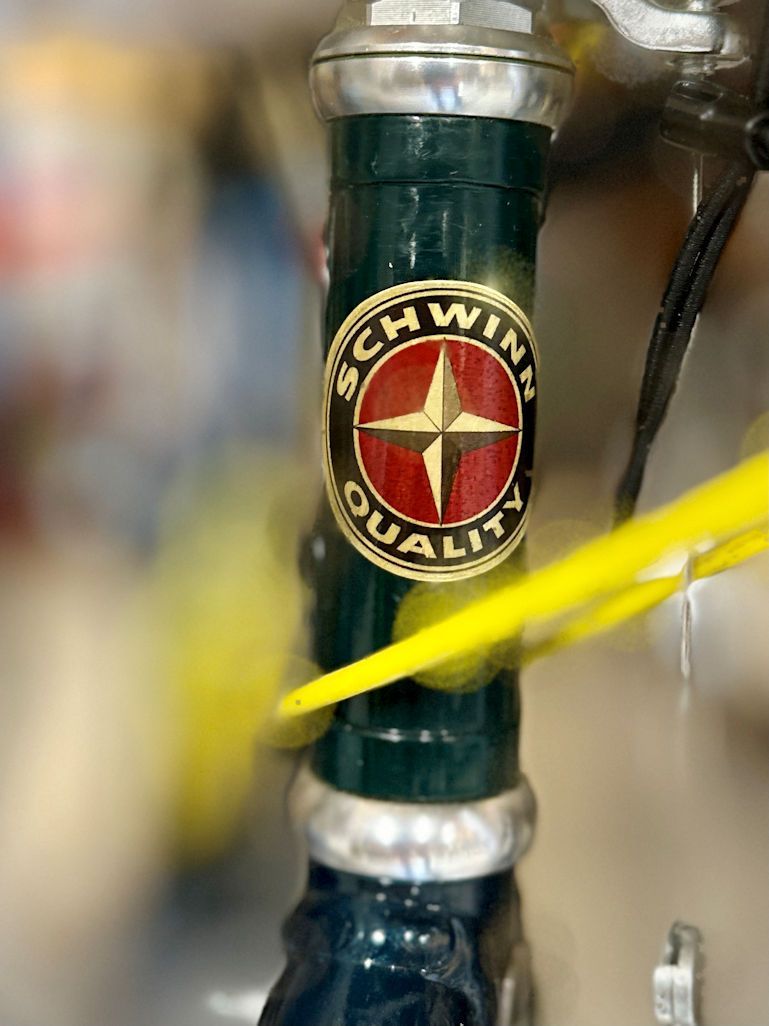
Here is a papaya-colored Trek logo on a metal-flake silver background, and a Schwinn badge where the underlying brass shows through.
White glossy self-adhesive vinyl. I use this for anything that requires light colors or white. I get the thinnest stock I can find. I use a plotting cutter or Xacto knife to remove the bits of vinyl in the areas where the bike color needs to show through, and I trim the edges so that none of the white vinyl remains outside the printed image.
Clear glossy self-adhesive vinyl. I use this like I use clear slide-on decals, but I stick them on rather than slide them on. Because they are clear, they work best for decals that are black or other dark colors on a light-colored frame. But like with white vinyl, it is thicker than slide-on media so the edges will show up more than a slide-on decal would when applied to the bike.
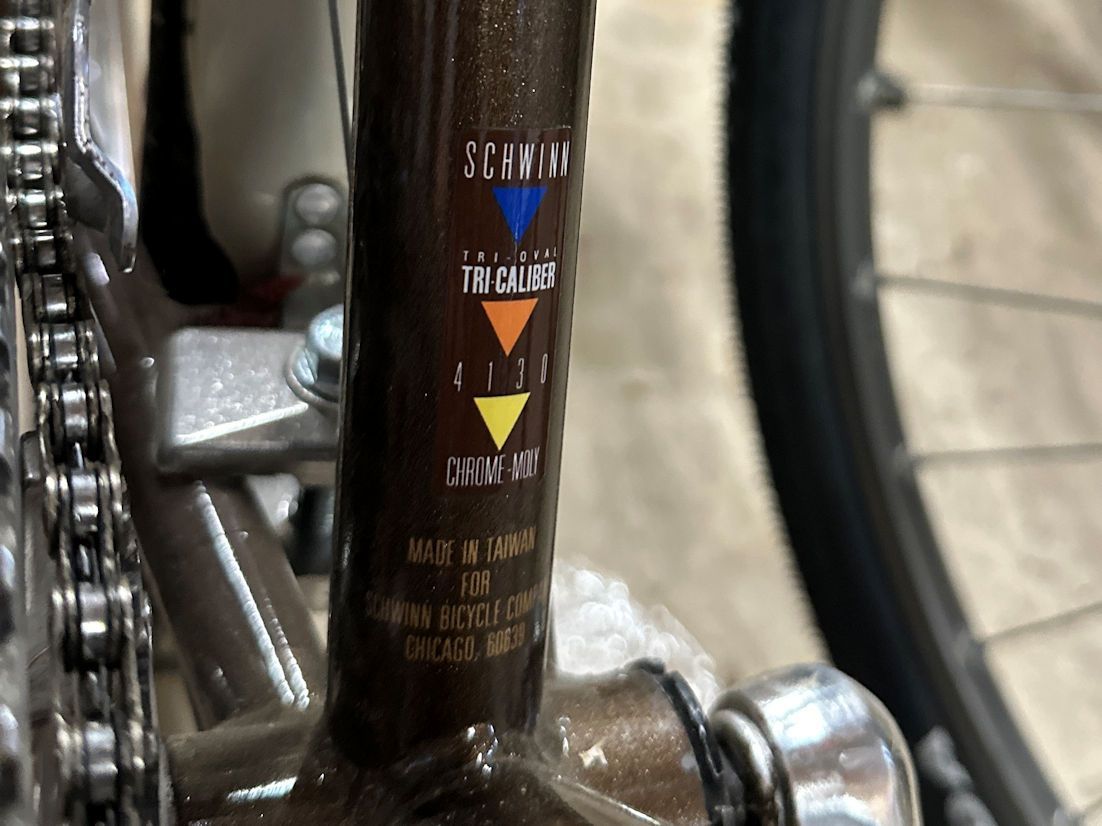
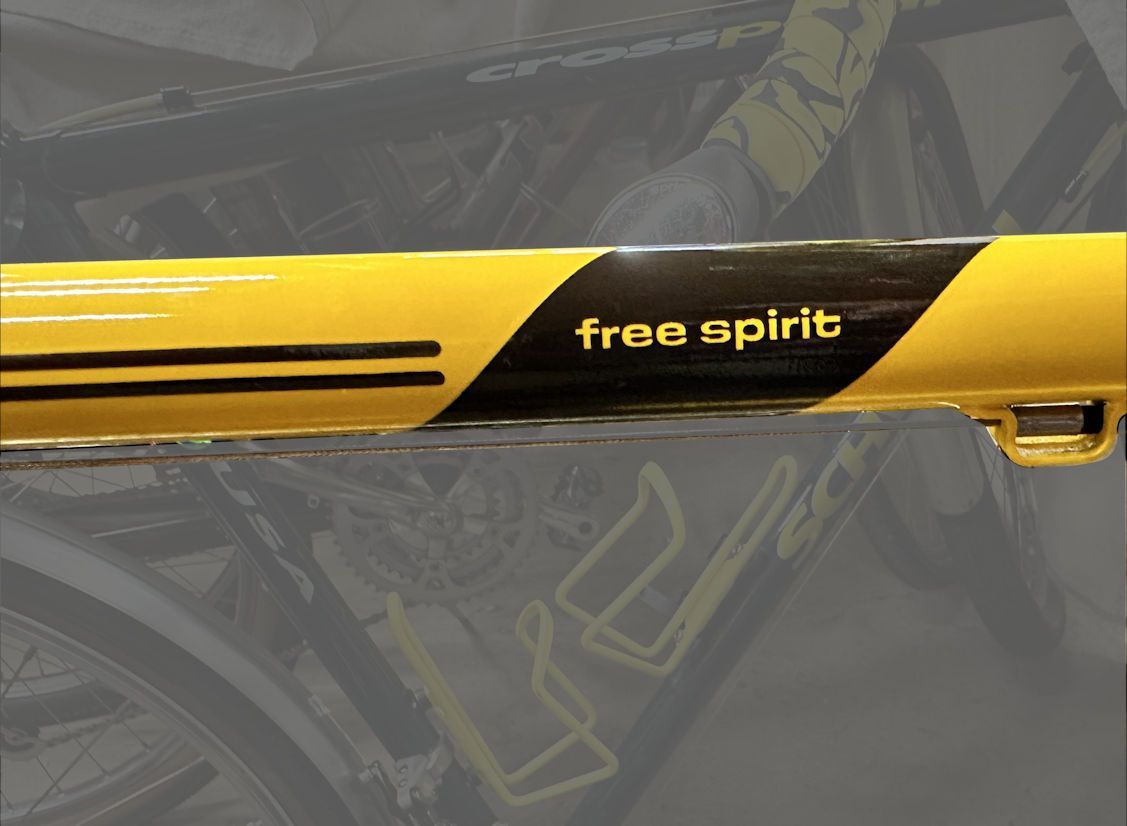
In the following photo the top decal is on white vinyl and the bottom one is on clear vinyl.

White glossy slide-on decal paper. While I have not personally used this yet, I would use it like the white self-adhesive vinyl I have used for images that require white in the print area, either as a component of lighter colors or as a field color itself.
I could see myself using this for images that don’t require voids in the decal image for letting the bike paint show through. Such voids might occur between text letters or inside of individual letters, such as an “O.”
In cases where I need voids in the decal, because of the difficulties of “weeding” or stripping away bits of a slide-on decal to let the paint show through, I would design the decal to be on a background color that is very close to the color of the bike frame in the areas where I want the bike color to “show through,” and also around the outer edges of the image.
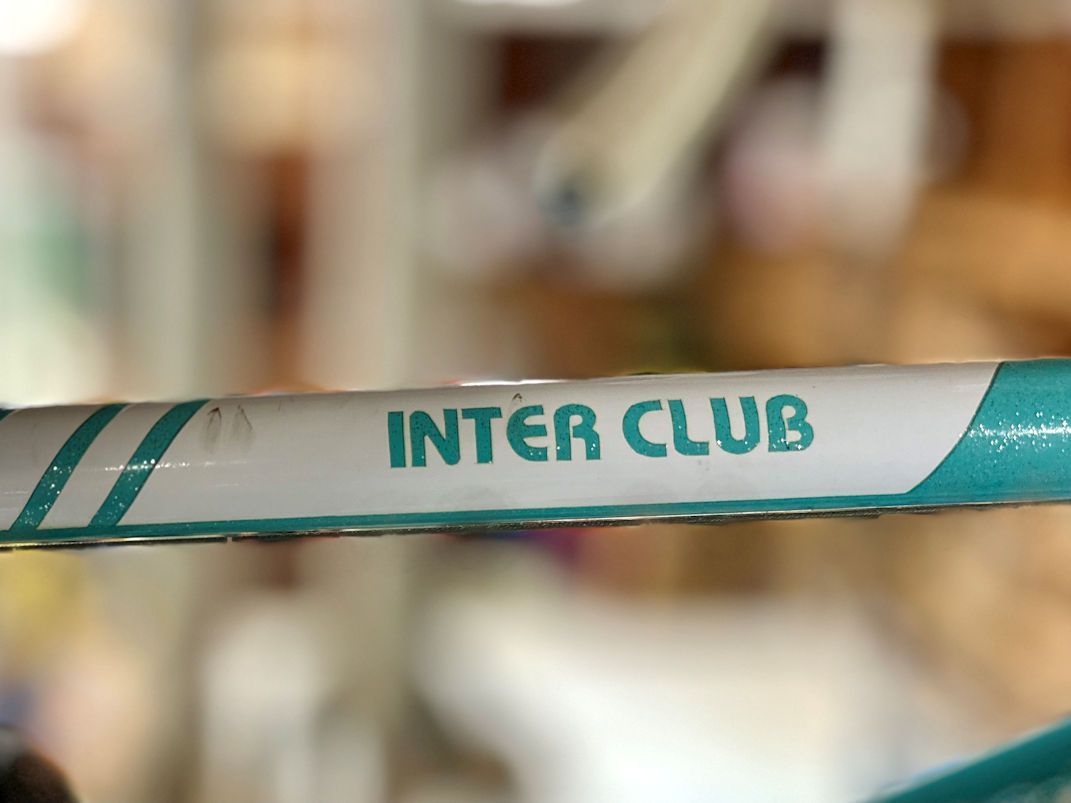
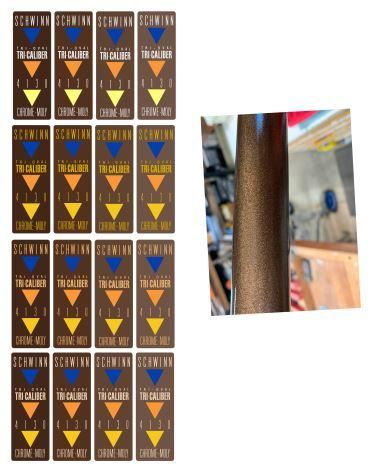
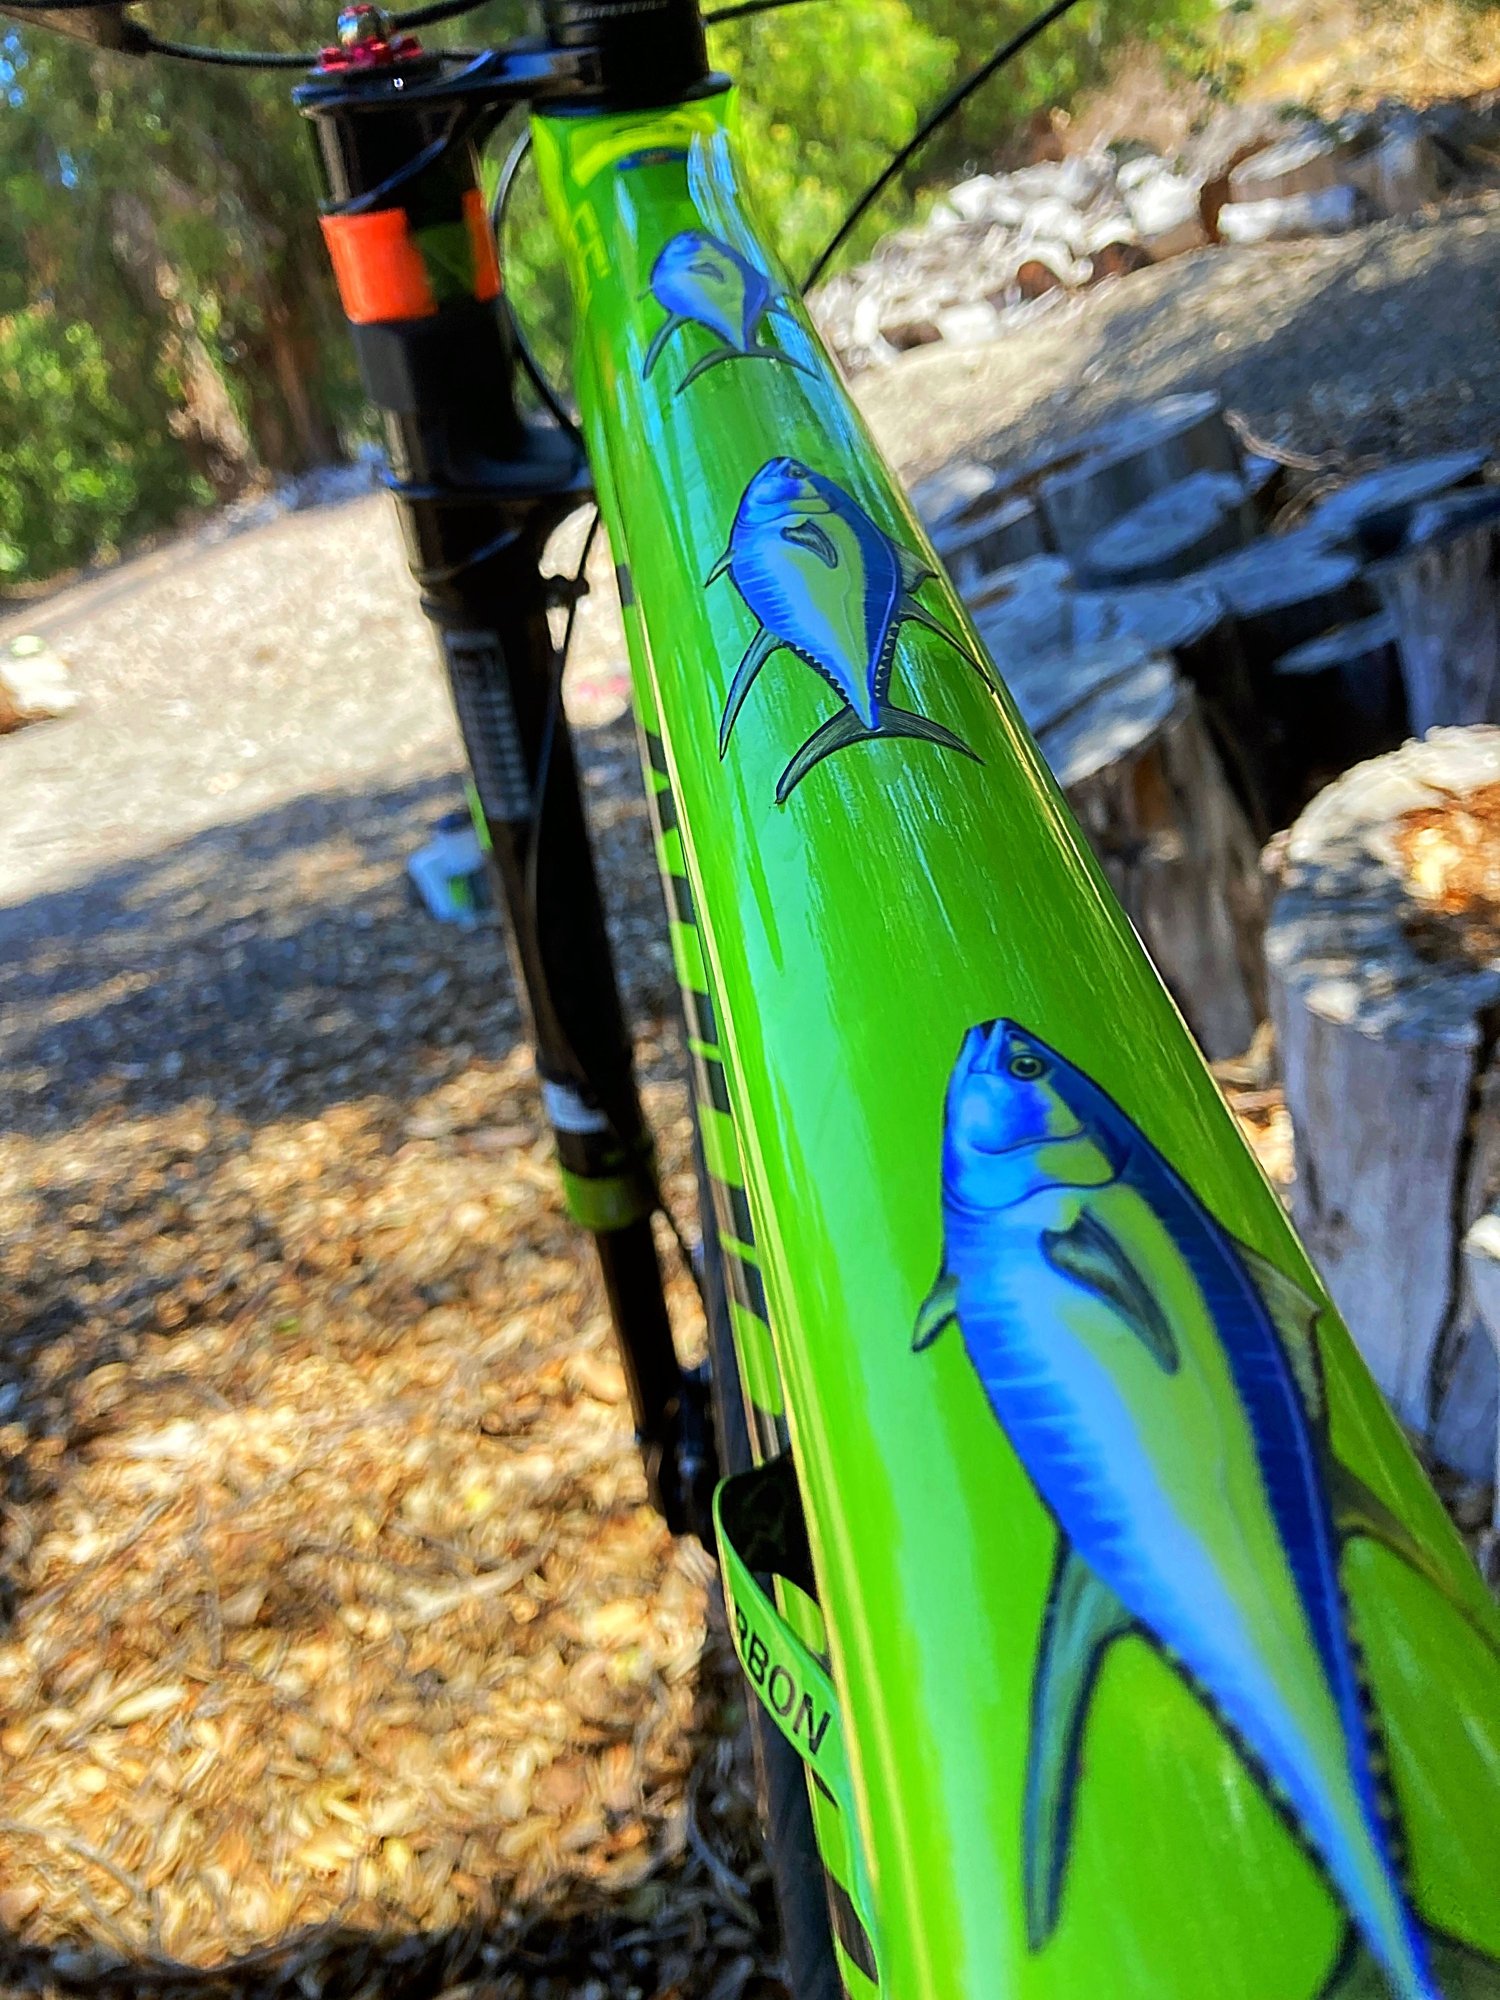
The decal shown below is on white self-adhesive vinyl because I needed white and other light colors. I could have also used white slide-on media for it.
I made the background color of the decal match the frame color as best I could by taking a photo of a section of the frame, importing it into my drawing program, and using the clone feature of the tool to fill the decal shape with the cloned color.
I cloned from different areas of my photo to get slight variations in color, and then picked the one that matched the frame the best.
Which decal media I use depends on the color of the bike and the nature of the decal. The major thing I must consider is that I cannot print the color white. Home printers are 3-color printers. 4-color printers introduce white as the fourth color. As you probably know, home printers use the white of the print media to provide the white component of printed colors and for fields of white.
If I am printing on clear media, and I’m not printing all in black, the printer is counting on the color of the surface beneath the decal to provide the white. If that surface isn’t white, the printed colors will be modified by whatever color it is. Moreover, light printed colors won’t show up much at all on a dark-colored surface. Those cases are good candidates for white self-adhesive vinyl or white slide-on decals.
Decal Media Options I’m Familiar With
Clear glossy slide-on decal paper: I’ve found this works best for decals that are black or other very dark colors.
However, I have found I can create interesting effects with clear slide-on decals by purposely letting the underlying paint or metal blend with a semitransparent color in the decal to add texture or color.
Here is a papaya-colored Trek logo on a metal-flake silver background, and a Schwinn badge where the underlying brass shows through.
White glossy self-adhesive vinyl. I use this for anything that requires light colors or white. I get the thinnest stock I can find. I use a plotting cutter or Xacto knife to remove the bits of vinyl in the areas where the bike color needs to show through, and I trim the edges so that none of the white vinyl remains outside the printed image.
Clear glossy self-adhesive vinyl. I use this like I use clear slide-on decals, but I stick them on rather than slide them on. Because they are clear, they work best for decals that are black or other dark colors on a light-colored frame. But like with white vinyl, it is thicker than slide-on media so the edges will show up more than a slide-on decal would when applied to the bike.
In the following photo the top decal is on white vinyl and the bottom one is on clear vinyl.
White glossy slide-on decal paper. While I have not personally used this yet, I would use it like the white self-adhesive vinyl I have used for images that require white in the print area, either as a component of lighter colors or as a field color itself.
I could see myself using this for images that don’t require voids in the decal image for letting the bike paint show through. Such voids might occur between text letters or inside of individual letters, such as an “O.”
In cases where I need voids in the decal, because of the difficulties of “weeding” or stripping away bits of a slide-on decal to let the paint show through, I would design the decal to be on a background color that is very close to the color of the bike frame in the areas where I want the bike color to “show through,” and also around the outer edges of the image.
The decal shown below is on white self-adhesive vinyl because I needed white and other light colors. I could have also used white slide-on media for it.
I made the background color of the decal match the frame color as best I could by taking a photo of a section of the frame, importing it into my drawing program, and using the clone feature of the tool to fill the decal shape with the cloned color.
I cloned from different areas of my photo to get slight variations in color, and then picked the one that matched the frame the best.
__________________
Living life on the small chainring.
Living life on the small chainring.
Last edited by daywood; 09-11-24 at 05:13 PM.
09-11-24, 04:58 PM
#15
Member
Thread Starter
Advantages and Disadvantages of Slide-On and Self-Adhesive Media.
I�ve found the advantage of slide-on decal media is that it is thinner than self-adhesive media and can therefore blend in well with the overall bike finish; that is, it looks like part of the paint rather than something I�ve applied. Another advantage is that I can reposition the decal slightly if I act quickly.
A disadvantage of slide-on media is that they can be difficult to slide onto the bike frame without wrinkles, folds, or tears if they are either very large or have irregular shapes; that is, if elements of the design protrude more than a little bit from the basic shape of the decal. I usually print multiple copies of slide-on decals in case I mess any of them up while applying them.
__________________
Living life on the small chainring.
Living life on the small chainring.
09-11-24, 05:09 PM
#16
Senior Member
Holy smokes those decals are incredible! You have created beautiful recreations of the originals. Thanks for sharing your work in such great detail.
Likes For ARider2:
09-11-24, 05:20 PM
#17
Member
Thread Starter
09-11-24, 06:53 PM
#18
Senior Member

Join Date: May 2010
Location: Bastrop Texas
Posts: 4,785
Bikes: Univega, Peu P6, Peu PR-10, Ted Williams, Peu UO-8, Peu UO-18 Mixte, Peu Dolomites
Liked 1,859 Times
in
1,193 Posts
I especially like the way you detailed then process in pictures. Great Thread!
__________________
 No matter where you're at... There you are... Δf:=f(1/2)-f(-1/2)
Likes For zandoval:
09-11-24, 07:03 PM
#19
Member
Thread Starter
09-11-24, 07:16 PM
#20
dot dash
Join Date: Jun 2015
Location: Land of Pleasant Living
Posts: 12,612
Bikes: Shmikes
Liked 6,205 Times
in
3,339 Posts
Bravo!
Likes For MoAlpha:

Likes For Jimriides:
Likes For VegasJen:
09-12-24, 05:05 AM
#23
Method to My Madness
Join Date: Nov 2020
Location: Orange County, California
Posts: 4,151
Bikes: Trek FX 2, Cannondale Synapse x2, Cannondale CAAD4, Santa Cruz Stigmata 3
Liked 1,707 Times
in
1,174 Posts
Excellent detailed writeup. My wife also uses Cricut Maker 3, so I am going to forward her this thread for reference on how to apply decals.
Likes For SoSmellyAir:
09-12-24, 05:49 AM
#24
I don't know.

Join Date: May 2003
Location: South Meriden, CT
Posts: 2,233
Bikes: '90 B'stone RB-1, '92 B'stone RB-2, '89 SuperGo Access Comp, '03 Access 69er, '23 Trek 520, '14 Ritchey Road Logic, '09 Kestrel Evoke, '08 Windsor Tourist, '17 Surly Wednesday, '89 Centurion Accordo, '15 CruX, '17 Ridley X-Night, '89 Marinoni
Liked 1,052 Times
in
536 Posts
great thread. Thanks.
Likes For RB1-luvr:
09-12-24, 06:26 AM
#25
Senior Member
Join Date: Oct 2017
Location: NJ
Posts: 682
Bikes: 68 SS, 72 Fuji Finest, 72 PX-10, 77 Pana Pro 7000, 84 Pinnarello Treviso NR, 84 Trek 520, 88 Project KOM, 90 Trek 750, 91 Trek 930
Liked 229 Times
in
157 Posts
Wow! This looks like a lot of work that most importantly requires great patience.
Thanks.
Thanks.
__________________
Last new bike 1991
Last new bike 1991
Likes For dmark: