


BFSSFG HOWTO: Frame/fork painting in 10 steps... for Dummies!
 07-04-07, 02:35 PM
#1
No plan.
Thread Starter

Join Date: May 2007
Location: PA
Posts: 2,743
Mentioned: 0 Post(s)
Tagged: 0 Thread(s)
Quoted: 0 Post(s)
Likes: 0
Liked 0 Times
in
0 Posts
BFSSFG HOWTO: Frame/fork painting in 10 steps... for Dummies!
(note -- more pictures from my own work and spell checking to come later )
)
Hello!
This week I began painting an old Santropez frame that came on my first fixed gear. You know how your first used bike probably was -- fugly, nicked, scratched, maybe even dented. Sure, you can buy top tube covers, cover your frame in bar wrap, use excessive stickers, but there's nothing like having a good, clean frame. Especially if you like to drool over all those simple yet elegant bikes on fixedgeargallery.
This HOWTO is focused for those new to cycling mechanisms and cycling in general. It starts off very basic. Throughout this HOWTO, important tools, products, or other objects needed for a good job will be in UPPERCASE ITALICS.
So, back on topic. Let's take two or three days and get that old clunker into a beautiful machine worthy of any street riding, shall we? Let's take some precursor steps:
-----------
First, you MUST remove the front and rear wheels, obviously. A 15mm wrench is good for this . Next off are the chain, pedals, and crank arms.
The chain comes off with a CHAIN BREAKER. This is a handheld tool which will remove links in the chain so it can be removed from the frame completely. They are sold at your local bike shop (LBS) for about $10, although Walmart has these in the bike section for $6. They're all pretty much re-branded from the same factory (except for the pro quality park tools, perhaps) so you're getting the same thing.
This is what a chain breaker looks like:
When you remove the chain, it is IMPERATIVE that you do not unscrew the link until it falls out. You'll either have to buy a new chain or remove an entire link. Trying to hammer the link back in can comprise the integrity of that link and your drivetrain.
Okay, so now let's remove those cranks. Pull off the round dustcaps -- some cranks use allen wrenches, some just pop off. Inside will be a screw and likely a washer under the screw. Wrench those off on both sides and set aside. See those threads... the big ones... around the cranks where the dust caps were? We need a special tool -- a CRANK PULLER -- to remove the cranks. These are also around $10 at the LBS for the "economy" type, which require an adjustable wrench. Park also makes a version with a wrench built in, but I don't see the need to spend extra money unless you're doing this daily or something.
Note -- there are two types of crank threads, mainly the common threaded type and an ISIS system. Yours is almost definitely this common "square spindle" threaded system.
Here's a crank puller: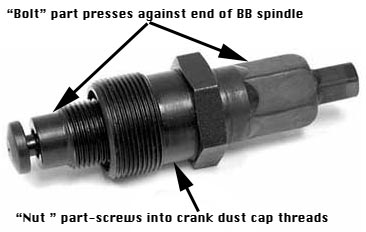
There are many threads and websites explaining exactly how to use this tool. If your LBS won't tell you how to use it, don't buy from them. Ever.
Now you should have only a bottom bracket and spindle where your cranks were. You can remove both if you really want, but you can just mask these. We'll get into that later.
Let's remove the handlebars and stem now. Most stems are simply the "quill" type. Just stick a 6MM allen wrench in the hole on the top of the stem and remove the assembly.
That's all the REQUIRED disassembly. You can leave the headset and fork on, or to make everything easier, remove both. Up to you.
-----------
Now that you have a bare frame, let's begin:
Step 1 - Sexy prep time!
We need to get all the decals and **** off your frame. Have at it -- I usually just scrape them off with a sharp, fresh razor blade. For cheapo **** goo-gone may even work. A hairdryer also removes the decals. If you're painting, you probably don't care about getting any scratches or other nicks in the paint job, so just get the crap off.
If you have a sticker-filled bike, punk style, this could take an entire evening. It took me about 4 hours. Relax, take lots of breaks, and drink lots of your favorite cold beverage. It helps to have a basement with TV. You can listen/watch and scrape at the same time.
Now we need to mask everything that can't or shouldn't be painted or sanded. Please, please use the $3 roll of SCOTCH BLUE PAINTER'S TAPE, not the 99 cent roll of no-name tape which will fall off halfway through the paint job. Mask the spindle and bottom bracket if you've left them in, the headset, and anything else you don't want affected like those medal emblems on the front of some bikes which are riveted in.
For the emblems and headsets you can use a blade to cut off tape and do slick masking. It's not terrible if you paint something you didn't mean to -- a little acetone later and it'll be gone.
Step 2 - Sanding
It's not a good idea to sand all the decals and stickers off. You're going to go through paper like mad and leave this black sticky residual that has to be scraped off anyway.
Anyhow, in this step we want an EVEN FRAME, not one without absolutely any paint left on it. Bringing everything down to bare metal is "reccomended" but certainly not necessary for a great finish. Unless your frame is some seriously beat **** from the 70s -- in that case, stop reading and go pay to have it sandblasted.
Start sanding with about 150 grit, just working the paint and base coat off. You'll hit metal at some spots. We're looking to even out the paint and especially remove the clear coat originally there. You want paint to be dull and there to be a long "gradiant" between bare metal and paint. That means that there's an evenness that's cancelling the difference in depth between the metal and paint. For example, my red frame had the dull paint, then maybe 2 cm of white base coat, leading into bare metal.
This job is easier to do with a PALM SANDER, an electric tool that holds a sheet of sandpaper and shakes it quickly. $10 at the local pawn shop or about $30 new at Home Depot. If you're a fairly DIY person like me, this is a good investment. I also refinish bass guitar bodies so this thing is used all the time. You can make up the investment by loaning it out to your friends for some beer or something.
You need to sand this crap on the top, bottom, and down tubes. For the tube holding the bottom bracket and fork, along with other hard-to-sand spots, you can get away with scuffing up the paint with 220 grit paper. Just work off the glossy clear coat. At this time let's sand everything to 220, okay?
Assuming everything's dull and has been sanded to 220, let's look for dents or other **** ups. Obviously you can sand out high spots, but what about the lows?
Despite its association with wood and walls, SPACKLE or WOOD PUTTY will fill in dents or decently-bad nicks. Apply it in globs, let it dry, and sand out. It should hold up decently well once primer glues it to the surrounding metal.
Give everything a once-over with maybe 400 grit or steel wool. Check all tubes with your fingers and make sure you can't feel any imperfections, unless you just don't care.
Oh yeah, scuff up the fork too. In my experience forks are usually not very beat up so they only need a decal removal and scuffing up. If your fork has chrome at the bottom you should mask that off. It'll look perty.
Step 3 - Primer prep!
Today's your main painting day. Before we talk about what paint and primer to use, let's set up your paintspace.
Like any painter knows, only paint on days that aren't too humid and on days without too much moisture in the air. Painting the day after a rainstorm is cool, but not two or three hours after one.
Use a driveway, a garage, or even your basement. If you're doing it indoors, keep the windows open. Keep ventilation closed so the fumes don't stink up the rest of your house.
Lay down either a folded-up cardboard box or some newspaper. Alternatively, you can tie rope inside the tube where your bottom bracket was and hang it off of a pipe or something. Improvise!
Bring your frame out with the top tube facing down. The frame should be upside-down. You'll need to rest it on a milk crate or something, man.
First step here is to WIPE DOWN EVERYTHING in either ACETONE or at least water with dish detergent on a NON-FIBER CLOTH (the kind you use to clean CDs with). You cannot have any dust, debris, or worse, fingerprints or skin oils on the frame. Nothing will stick to it, or when you lay down the base coat it will look crackly and be terrible. Kay. Let's take a reading break to learn about primers, paints, and coats.
Interlude - paint materials
Let's understand that a quality job means quality paints. You can't use Krylon and expect it to look decent. The right paint to use is Duplicolor, sold in auto parts stores and Walmart. You want to grab a full-sized bottle of DUPLICOLOR SELF-ETCHING PRIMER , either white for lighter colors or army green for darker ones. It's important to grab self-etching because it will hold itself in those light scuff marks you have and even itself out, especially among the differing surfaces of old paint, bare metal, and spackle. Great stuff, even for non-bike primering.
Let's pick your color too. You also want DUPLICOLOR paints, a full-sized bottle. Those touch-up bottles just won't do it for a full-sized road bike. I'm partial to the metallic speck colors, but get whatever you want. You can even grab an extra can of the army green self-etching primer if you're going for the Pista GanGreen color.
Last, pick up at least one can of DUPLICOLOR CLEAR for your top coats. Even better if you can get one big can and one touch-up sized one. I think they make gloss and matte, but most people use gloss. Do NOT use another company's clear for the top coats unless you're sure they're compatible (the kid working at the auto parts store won't know any better than you, so he's not a reliable source). That old can of Krylon clear your dad used once and threw in the garage is a bad idea. Really. Using incompatible clears WILL likely lift up the paint and primer, leaving you back at Step 1. Don't.
Again, don't try to cheap out on the paint. Two cans of Krylon for $6 at Home Depot won't do the job. No. Unless you have connections or a discount, or encounter a paint sale, expect to spend $30ish.
Painting will be easier if you get a SPRAY GUN ADAPTOR. This is an ingeneous adaptor that makes any rattle can into more of a gun (duh). Great for controlling those coats. They're completely re-usuable, maybe $3 at Home Depot.
Step 4 - Prime time
Let's get at it. Shake your primer for at least 2 minutes and just spray EVENLY across all the tubes. Don't worry about the top, we'll flip the frame over and do that later. Get two or three even coats. Let each coat dry for about 5-10 minutes. You might want to spray extra layers at the dropouts, both front and rear, because these will inevitably see the most wear. Another good place to spray extra at is the seat post binders.
Sand the primered frame with 0000 steel wool and clean with your acetone or rag. You don't need the primer to make a solid color. You should be able to see an outline of the old paint and metal below it, just make sure it's smooth. We're not PAINTING, just giving paint a good surface to attatch to.
Flip the bike over, prime the unprimed spots, and don't forget the weird places, like where the three tubes meet and that weird area behind the downtube, below the binders.
Steel wool, wipe, and take a break.
Step 5 - Paint it up!
Give your primer about 30 minutes to an hour to cure. Repeat basically the same steps with your paint, starting with the frame flipped upside down. Keep checking for spots not painted yet. Use up the paint, but you should be looking at 5-6 coats. Remember to get those drops good.
Let it cure for an hour or 75 minutes.
Let me explain something -- some people say to get a "pro job" you need to let each coat of primer and paint dry for a ridiculous amount of time, something like 24h each. If you're doing a spray job, it's not ghetto but hardly "top notch pro," so this is bologna. You won't notice any real difference at this detail level.
Step 6 - Pour some sugar on me
Let's clear. Same damn steps. Get it extra wet looking. Thin, thin coats, waiting 2-5 minutes between each one. Clears spray more like a mist than a paint, so be prepared. It should really start to pop now.
Yeah.
That's really all to this step!
Step 7 - Finishing up
By now your frame should look like a shiny piece of candy, booty candy. But we're not over. Oh no. We can do one more thing to make it like... bootylicious. Let's wet sand.
Wait for the clear to dry a good 4-5 hours. You can do this step inside on a hard basement floor, with relatively little mess, since it's probably getting dark out by now.
You need to grab 2000 GRIT AUTO SANDPAPER, probably from the same store you got the paints. I think only 3M makes this stuff. Little 6x10 sheets are fine.
So we're basically doing a polish step, like every car and motorcycle fabricator does on those TV shows on Discovery.
Wet sanding isn't very hard. Get a mixture of 90 percent lukewarm water and 10 percent hand or dish soap. Wet your high-grit paper in this and basically start sanding, just do it very carefully and not for too long in one spot. Re-wet the paper often. After everything dries, you're basically done.
Step 8 - Re-assembly
Re-assemble everything. Basically now's the best time to overhaul and maintain. Replace the bar wrap if it's old. Get a new wheelset if yours is trashy, especially since you can probably find one with complementary-colored rims. I like the eBay $130 Wienmann rims laced to Formula hubs by wheelandsprocket. They're good enough for me. The Formulas are fine mid-level hubs and the Wienmanns are decent enough Deep V knockoffs. They come in all sorts of colors.
Now's probably an okay time to replace or at least re-grease your chain. Chains wear quickly on fixies and you need to make sure it won't break. Just go buy a new one. It's an opportunity to color compliment!!
Let's also re-grease any other parts you took off. You did buy a tub of bike grease, right?
So everything's together? Wonderful. It's probably a good idea to take your bike to the LBS just to make sure everything's safe. They shouldn't charge more than $15 for a once-over.
Enjoy!
Step 9 - Addendium
Let's cover a few more common frame painting topics.
So you didn't clean up a spot on the bare metal or old paint good enough, and got some crackles or otherwise a ****up on your frame? Or you didn't shake often enough and got some paint drips? It's okay.
The easiest way to fix this is to sand the offending area at 220 grit down to bare metal, sand the surrouding area with wool to get a gradient into the bare spot, and re-primer and paint the entire sanded area. Not too bad. If you notice this it's important to LET THE PAINT DRY BEFORE FIXING. It's a bummer, but sanding tacky paint is a whole nother problem.
So your frame has those fancy, classy lugs rather than only weld marks connecting the tubes? You can do some simple pinstriping around the lugs to make your ride even more swag. Pick up a small thing of TESTORS MODEL PAINT at a hobby shop or Walmart along with a thin brush. Basically just paint along the lugs. It will look pretty. You can also paint the drops special colors, do pinstriping throughout the bike, or whatever else. Obviously do this before the clear coat.
Step 10 - Accessorize
So we can add some other cool stuff to the frame. Top tube covers are cheap (R.E.load makes them, if you live in Philly or Seattle) or you can make them yourself. If you have drop/aero bars you can also cover the part of your frame where they could hit with bar wrap, tape, or whatever else. Both are hip and cheap.
Some people also tape up the area by the chain since it gets dirty quick.
You can also make your own stickers! If you're skilled in Photoshop make up some. Work with inches to get a better idea of how big the stix will be. I use 72 dpi for mine but most people like to use print-quality 200dpi.
Staples sells sticker paper and wet transfer paper. Wet transfers are good for logos on the tubes but are a ***** to work with. For the sticker paper: print, let dry, and then coat the paper in either a lacquer or leftover clear coat. Then cut with an X-acto knife or razor blade.
HAPPY PAINTING!
)Hello!
This week I began painting an old Santropez frame that came on my first fixed gear. You know how your first used bike probably was -- fugly, nicked, scratched, maybe even dented. Sure, you can buy top tube covers, cover your frame in bar wrap, use excessive stickers, but there's nothing like having a good, clean frame. Especially if you like to drool over all those simple yet elegant bikes on fixedgeargallery.
This HOWTO is focused for those new to cycling mechanisms and cycling in general. It starts off very basic. Throughout this HOWTO, important tools, products, or other objects needed for a good job will be in UPPERCASE ITALICS.
So, back on topic. Let's take two or three days and get that old clunker into a beautiful machine worthy of any street riding, shall we? Let's take some precursor steps:
-----------
First, you MUST remove the front and rear wheels, obviously. A 15mm wrench is good for this
. Next off are the chain, pedals, and crank arms.The chain comes off with a CHAIN BREAKER. This is a handheld tool which will remove links in the chain so it can be removed from the frame completely. They are sold at your local bike shop (LBS) for about $10, although Walmart has these in the bike section for $6. They're all pretty much re-branded from the same factory (except for the pro quality park tools, perhaps) so you're getting the same thing.
This is what a chain breaker looks like:
When you remove the chain, it is IMPERATIVE that you do not unscrew the link until it falls out. You'll either have to buy a new chain or remove an entire link. Trying to hammer the link back in can comprise the integrity of that link and your drivetrain.
Okay, so now let's remove those cranks. Pull off the round dustcaps -- some cranks use allen wrenches, some just pop off. Inside will be a screw and likely a washer under the screw. Wrench those off on both sides and set aside. See those threads... the big ones... around the cranks where the dust caps were? We need a special tool -- a CRANK PULLER -- to remove the cranks. These are also around $10 at the LBS for the "economy" type, which require an adjustable wrench. Park also makes a version with a wrench built in, but I don't see the need to spend extra money unless you're doing this daily or something.
Note -- there are two types of crank threads, mainly the common threaded type and an ISIS system. Yours is almost definitely this common "square spindle" threaded system.
Here's a crank puller:
There are many threads and websites explaining exactly how to use this tool. If your LBS won't tell you how to use it, don't buy from them. Ever.
Now you should have only a bottom bracket and spindle where your cranks were. You can remove both if you really want, but you can just mask these. We'll get into that later.
Let's remove the handlebars and stem now. Most stems are simply the "quill" type. Just stick a 6MM allen wrench in the hole on the top of the stem and remove the assembly.
That's all the REQUIRED disassembly. You can leave the headset and fork on, or to make everything easier, remove both. Up to you.
-----------
Now that you have a bare frame, let's begin:
Step 1 - Sexy prep time!
We need to get all the decals and **** off your frame. Have at it -- I usually just scrape them off with a sharp, fresh razor blade. For cheapo **** goo-gone may even work. A hairdryer also removes the decals. If you're painting, you probably don't care about getting any scratches or other nicks in the paint job, so just get the crap off.
If you have a sticker-filled bike, punk style, this could take an entire evening. It took me about 4 hours. Relax, take lots of breaks, and drink lots of your favorite cold beverage. It helps to have a basement with TV. You can listen/watch and scrape at the same time.
Now we need to mask everything that can't or shouldn't be painted or sanded. Please, please use the $3 roll of SCOTCH BLUE PAINTER'S TAPE, not the 99 cent roll of no-name tape which will fall off halfway through the paint job. Mask the spindle and bottom bracket if you've left them in, the headset, and anything else you don't want affected like those medal emblems on the front of some bikes which are riveted in.
For the emblems and headsets you can use a blade to cut off tape and do slick masking. It's not terrible if you paint something you didn't mean to -- a little acetone later and it'll be gone.
Step 2 - Sanding
It's not a good idea to sand all the decals and stickers off. You're going to go through paper like mad and leave this black sticky residual that has to be scraped off anyway.
Anyhow, in this step we want an EVEN FRAME, not one without absolutely any paint left on it. Bringing everything down to bare metal is "reccomended" but certainly not necessary for a great finish. Unless your frame is some seriously beat **** from the 70s -- in that case, stop reading and go pay to have it sandblasted.
Start sanding with about 150 grit, just working the paint and base coat off. You'll hit metal at some spots. We're looking to even out the paint and especially remove the clear coat originally there. You want paint to be dull and there to be a long "gradiant" between bare metal and paint. That means that there's an evenness that's cancelling the difference in depth between the metal and paint. For example, my red frame had the dull paint, then maybe 2 cm of white base coat, leading into bare metal.
This job is easier to do with a PALM SANDER, an electric tool that holds a sheet of sandpaper and shakes it quickly. $10 at the local pawn shop or about $30 new at Home Depot. If you're a fairly DIY person like me, this is a good investment. I also refinish bass guitar bodies so this thing is used all the time. You can make up the investment by loaning it out to your friends for some beer or something.
You need to sand this crap on the top, bottom, and down tubes. For the tube holding the bottom bracket and fork, along with other hard-to-sand spots, you can get away with scuffing up the paint with 220 grit paper. Just work off the glossy clear coat. At this time let's sand everything to 220, okay?
Assuming everything's dull and has been sanded to 220, let's look for dents or other **** ups. Obviously you can sand out high spots, but what about the lows?
Despite its association with wood and walls, SPACKLE or WOOD PUTTY will fill in dents or decently-bad nicks. Apply it in globs, let it dry, and sand out. It should hold up decently well once primer glues it to the surrounding metal.
Give everything a once-over with maybe 400 grit or steel wool. Check all tubes with your fingers and make sure you can't feel any imperfections, unless you just don't care.
Oh yeah, scuff up the fork too. In my experience forks are usually not very beat up so they only need a decal removal and scuffing up. If your fork has chrome at the bottom you should mask that off. It'll look perty.
Step 3 - Primer prep!
Today's your main painting day. Before we talk about what paint and primer to use, let's set up your paintspace.
Like any painter knows, only paint on days that aren't too humid and on days without too much moisture in the air. Painting the day after a rainstorm is cool, but not two or three hours after one.
Use a driveway, a garage, or even your basement. If you're doing it indoors, keep the windows open. Keep ventilation closed so the fumes don't stink up the rest of your house.
Lay down either a folded-up cardboard box or some newspaper. Alternatively, you can tie rope inside the tube where your bottom bracket was and hang it off of a pipe or something. Improvise!
Bring your frame out with the top tube facing down. The frame should be upside-down. You'll need to rest it on a milk crate or something, man.
First step here is to WIPE DOWN EVERYTHING in either ACETONE or at least water with dish detergent on a NON-FIBER CLOTH (the kind you use to clean CDs with). You cannot have any dust, debris, or worse, fingerprints or skin oils on the frame. Nothing will stick to it, or when you lay down the base coat it will look crackly and be terrible. Kay. Let's take a reading break to learn about primers, paints, and coats.
Interlude - paint materials
Let's understand that a quality job means quality paints. You can't use Krylon and expect it to look decent. The right paint to use is Duplicolor, sold in auto parts stores and Walmart. You want to grab a full-sized bottle of DUPLICOLOR SELF-ETCHING PRIMER , either white for lighter colors or army green for darker ones. It's important to grab self-etching because it will hold itself in those light scuff marks you have and even itself out, especially among the differing surfaces of old paint, bare metal, and spackle. Great stuff, even for non-bike primering.
Let's pick your color too. You also want DUPLICOLOR paints, a full-sized bottle. Those touch-up bottles just won't do it for a full-sized road bike. I'm partial to the metallic speck colors, but get whatever you want. You can even grab an extra can of the army green self-etching primer if you're going for the Pista GanGreen color.
Last, pick up at least one can of DUPLICOLOR CLEAR for your top coats. Even better if you can get one big can and one touch-up sized one. I think they make gloss and matte, but most people use gloss. Do NOT use another company's clear for the top coats unless you're sure they're compatible (the kid working at the auto parts store won't know any better than you, so he's not a reliable source). That old can of Krylon clear your dad used once and threw in the garage is a bad idea. Really. Using incompatible clears WILL likely lift up the paint and primer, leaving you back at Step 1. Don't.
Again, don't try to cheap out on the paint. Two cans of Krylon for $6 at Home Depot won't do the job. No. Unless you have connections or a discount, or encounter a paint sale, expect to spend $30ish.
Painting will be easier if you get a SPRAY GUN ADAPTOR. This is an ingeneous adaptor that makes any rattle can into more of a gun (duh). Great for controlling those coats. They're completely re-usuable, maybe $3 at Home Depot.
Step 4 - Prime time
Let's get at it. Shake your primer for at least 2 minutes and just spray EVENLY across all the tubes. Don't worry about the top, we'll flip the frame over and do that later. Get two or three even coats. Let each coat dry for about 5-10 minutes. You might want to spray extra layers at the dropouts, both front and rear, because these will inevitably see the most wear. Another good place to spray extra at is the seat post binders.
Sand the primered frame with 0000 steel wool and clean with your acetone or rag. You don't need the primer to make a solid color. You should be able to see an outline of the old paint and metal below it, just make sure it's smooth. We're not PAINTING, just giving paint a good surface to attatch to.
Flip the bike over, prime the unprimed spots, and don't forget the weird places, like where the three tubes meet and that weird area behind the downtube, below the binders.
Steel wool, wipe, and take a break.
Step 5 - Paint it up!
Give your primer about 30 minutes to an hour to cure. Repeat basically the same steps with your paint, starting with the frame flipped upside down. Keep checking for spots not painted yet. Use up the paint, but you should be looking at 5-6 coats. Remember to get those drops good.
Let it cure for an hour or 75 minutes.
Let me explain something -- some people say to get a "pro job" you need to let each coat of primer and paint dry for a ridiculous amount of time, something like 24h each. If you're doing a spray job, it's not ghetto but hardly "top notch pro," so this is bologna. You won't notice any real difference at this detail level.
Step 6 - Pour some sugar on me
Let's clear. Same damn steps. Get it extra wet looking. Thin, thin coats, waiting 2-5 minutes between each one. Clears spray more like a mist than a paint, so be prepared. It should really start to pop now.
Yeah.
That's really all to this step!
Step 7 - Finishing up
By now your frame should look like a shiny piece of candy, booty candy. But we're not over. Oh no. We can do one more thing to make it like... bootylicious. Let's wet sand.
Wait for the clear to dry a good 4-5 hours. You can do this step inside on a hard basement floor, with relatively little mess, since it's probably getting dark out by now.
You need to grab 2000 GRIT AUTO SANDPAPER, probably from the same store you got the paints. I think only 3M makes this stuff. Little 6x10 sheets are fine.
So we're basically doing a polish step, like every car and motorcycle fabricator does on those TV shows on Discovery.
Wet sanding isn't very hard. Get a mixture of 90 percent lukewarm water and 10 percent hand or dish soap. Wet your high-grit paper in this and basically start sanding, just do it very carefully and not for too long in one spot. Re-wet the paper often. After everything dries, you're basically done.
Step 8 - Re-assembly
Re-assemble everything. Basically now's the best time to overhaul and maintain. Replace the bar wrap if it's old. Get a new wheelset if yours is trashy, especially since you can probably find one with complementary-colored rims. I like the eBay $130 Wienmann rims laced to Formula hubs by wheelandsprocket. They're good enough for me. The Formulas are fine mid-level hubs and the Wienmanns are decent enough Deep V knockoffs. They come in all sorts of colors.
Now's probably an okay time to replace or at least re-grease your chain. Chains wear quickly on fixies and you need to make sure it won't break. Just go buy a new one. It's an opportunity to color compliment!!
Let's also re-grease any other parts you took off. You did buy a tub of bike grease, right?
So everything's together? Wonderful. It's probably a good idea to take your bike to the LBS just to make sure everything's safe. They shouldn't charge more than $15 for a once-over.
Enjoy!
Step 9 - Addendium
Let's cover a few more common frame painting topics.
So you didn't clean up a spot on the bare metal or old paint good enough, and got some crackles or otherwise a ****up on your frame? Or you didn't shake often enough and got some paint drips? It's okay.
The easiest way to fix this is to sand the offending area at 220 grit down to bare metal, sand the surrouding area with wool to get a gradient into the bare spot, and re-primer and paint the entire sanded area. Not too bad. If you notice this it's important to LET THE PAINT DRY BEFORE FIXING. It's a bummer, but sanding tacky paint is a whole nother problem.
So your frame has those fancy, classy lugs rather than only weld marks connecting the tubes? You can do some simple pinstriping around the lugs to make your ride even more swag. Pick up a small thing of TESTORS MODEL PAINT at a hobby shop or Walmart along with a thin brush. Basically just paint along the lugs. It will look pretty. You can also paint the drops special colors, do pinstriping throughout the bike, or whatever else. Obviously do this before the clear coat.
Step 10 - Accessorize
So we can add some other cool stuff to the frame. Top tube covers are cheap (R.E.load makes them, if you live in Philly or Seattle) or you can make them yourself. If you have drop/aero bars you can also cover the part of your frame where they could hit with bar wrap, tape, or whatever else. Both are hip and cheap.
Some people also tape up the area by the chain since it gets dirty quick.
You can also make your own stickers! If you're skilled in Photoshop make up some. Work with inches to get a better idea of how big the stix will be. I use 72 dpi for mine but most people like to use print-quality 200dpi.
Staples sells sticker paper and wet transfer paper. Wet transfers are good for logos on the tubes but are a ***** to work with. For the sticker paper: print, let dry, and then coat the paper in either a lacquer or leftover clear coat. Then cut with an X-acto knife or razor blade.
HAPPY PAINTING!
 07-04-07, 03:10 PM
#2
Taking "s" outta "Fast"

Join Date: Dec 2005
Location: Zoo York City
Posts: 1,989
Mentioned: 0 Post(s)
Tagged: 0 Thread(s)
Quoted: 0 Post(s)
Likes: 0
Liked 0 Times
in
0 Posts
I had fun doing my rattlecan job, but in end I would have saved money just going and getting my frame professionally done in the first place. The cost I paid for the pro job was less than an afternoon's worth of work and cost of supplies, and is infinitely more durable than the rattle can job I had on before.
I mean, it looked OK for several weeks, but i could scratch it off with my fingernail if I tried.
I mean, it looked OK for several weeks, but i could scratch it off with my fingernail if I tried.
07-04-07, 03:13 PM
#3
raodmaster shaman
Join Date: Dec 2004
Location: G-ville
Posts: 1,431
Mentioned: 0 Post(s)
Tagged: 0 Thread(s)
Quoted: 0 Post(s)
Likes: 0
Liked 0 Times
in
0 Posts
Great write up!
+1 on using quality paint. thats SOOO important, but since the DIY type usually on a budget its tempting to skimp out. DONT.
the only thing i have to add is that if you live in a humid area to try and paint the frame as soon as possible after sanding. in even a few hours rust can start to develop on the raw steel. causes all kind of problems under the paint.
07-04-07, 03:50 PM
#4
No plan.
Thread Starter
Join Date: May 2007
Location: PA
Posts: 2,743
Mentioned: 0 Post(s)
Tagged: 0 Thread(s)
Quoted: 0 Post(s)
Likes: 0
Liked 0 Times
in
0 Posts
Great comments, folks.
I agree that the downside to DIY painting is that it's not very durable. I'm in the process of dousing my frame in 20-25 coats of clear, so hopefully that will stand up after curing till the end of the week. Shouldn't be too bad.
The question is if anyhow has designed a "spray-on hardener," where one could paint the bike on their own time, to their own taste, and then have a powder coater spray a protective clear and bake it in their oven for minimal charge. Best of both worlds.
I will certainly add the comment about humidity. I'm going to keep adding to this post, including pictures, all tonight.
Is there any way to keep off rust, say if you want to paint the day after you sand? Keep the frame in the dry cellar?
I sanded last night and painted today. No problems at all. Then again, I don't live in a very humid area at all.
07-04-07, 04:19 PM
#5
The Brutally Handsome
Join Date: Jun 2007
Location: Siberia
Posts: 508
Mentioned: 0 Post(s)
Tagged: 0 Thread(s)
Quoted: 0 Post(s)
Likes: 0
Liked 2 Times
in
2 Posts
fyi, jasco paint remover is an excellent way to quickly remove paint and stickers. it comes in gel form and takes everything off in less than five minutes after application. gives you a really nice working surface and its 100% safe to use on all metals.
btw, very nice writeup. i'm always looking for painting tips. i never thought to use automotive paint. i tried model paint because they have brilliant colors, but they scratch too easily. thanks for the info!
btw, very nice writeup. i'm always looking for painting tips. i never thought to use automotive paint. i tried model paint because they have brilliant colors, but they scratch too easily. thanks for the info!
Last edited by Sizzle-Chest; 07-04-07 at 04:53 PM.
07-04-07, 04:38 PM
#6
Senior Member

Join Date: Nov 2005
Location: Boston
Posts: 622
Mentioned: 0 Post(s)
Tagged: 0 Thread(s)
Quoted: 0 Post(s)
Likes: 0
Liked 0 Times
in
0 Posts
Originally Posted by AfterThisNap
I had fun doing my rattlecan job, but in end I would have saved money just going and getting my frame professionally done in the first place. The cost I paid for the pro job was less than an afternoon's worth of work and cost of supplies, and is infinitely more durable than the rattle can job I had on before.
I mean, it looked OK for several weeks, but i could scratch it off with my fingernail if I tried.
I mean, it looked OK for several weeks, but i could scratch it off with my fingernail if I tried.
07-06-07, 09:08 PM
#7
thanks for not picking me

Join Date: Apr 2006
Location: Portland, OR
Posts: 255
Mentioned: 0 Post(s)
Tagged: 0 Thread(s)
Quoted: 0 Post(s)
Likes: 0
Liked 0 Times
in
0 Posts
When you remove the chain, it is IMPERATIVE that you do not unscrew the link until it falls out. You'll either have to buy a new chain or remove an entire link. Trying to hammer the link back in can comprise the integrity of that link and your drivetrain.
You just have to start by putting the pin inside the middle link first, then push it through one of the sides with the breaker tool.
Great DIY! I am actually in the midst of deciding what to do with a bare kilo tt. I stripped it with jasco and finished it off with a wire brush attached to a power drill. It looks nice and I just want to clear coat it with no color. So how much better is this duplicolor than krylon. Am i still going to be able to scratch into the clearcoat with my fingernail??
07-06-07, 09:23 PM
#8
It's an old photo

Join Date: Aug 2006
Location: Entropia
Posts: 774
Bikes: Cannondale R500, Specialized Hardrock
Mentioned: 0 Post(s)
Tagged: 0 Thread(s)
Quoted: 0 Post(s)
Likes: 0
Liked 0 Times
in
0 Posts
Very, very informative tips. Something most people should know, though, is that if they're looking for a simple single-color gloss paint job, some powdercoating places may be able to do it for cheap. I was lucky to find one locally (SE Michigan) that'd do it for $30 a frame, $30 sandblasting, and $5 for each additional part (stem, fork, etc.). It's good if they specialize in bikes, because then they'll know how to paint the hard-to reach places like the seat cluster and the bottom bracket area, and they'll know how to keep out of the bottom bracket threads and headset if you leave it in. And powdercoating is generally more durable.
07-06-07, 11:37 PM
#9
ass hatchet

Join Date: Nov 2003
Posts: 1,284
Mentioned: 0 Post(s)
Tagged: 0 Thread(s)
Quoted: 1 Post(s)
Likes: 0
Liked 0 Times
in
0 Posts
here's the best way to ensure a good paint job:
LET
IT
DRY.
let it sit for a day after you prime. after you've done the color and the clearcoat, let it sit a week. yes, a WEEK. don't get impatient and paint Saturday afternoon then build it up Sunday morning-- it needs to harden!
I'll also add that while Duplicolor is nice, the colors are totally boring. Think about it: bikes are usually more colorful than the average factory-painted car. Duplicolor is made to touch up cars...so it follows that it's boring. Beige with a little sparkle? They've got five different shades. The color of blue you'd expect to see used on a "country" themed interior wall that boasts goose-shaped stencils with little bows tied to their necks? I bet you love that color blue, and I bet your mom owns a minivan in that same damn color.
Painter's Touch (available at many hardware stores, home despot, etc) has decently cool colors and works fine if you're patient.
07-06-07, 11:49 PM
#10
raodmaster shaman
Join Date: Dec 2004
Location: G-ville
Posts: 1,431
Mentioned: 0 Post(s)
Tagged: 0 Thread(s)
Quoted: 0 Post(s)
Likes: 0
Liked 0 Times
in
0 Posts
Originally Posted by slopvehicle
let it sit for a day after you prime. after you've done the color and the clearcoat, let it sit a week. yes, a WEEK. don't get impatient and paint Saturday afternoon then build it up Sunday morning-- it needs to harden!
07-07-07, 01:21 AM
#11
Junior Member
Join Date: Jun 2007
Posts: 17
Mentioned: 0 Post(s)
Tagged: 0 Thread(s)
Quoted: 0 Post(s)
Likes: 0
Liked 0 Times
in
0 Posts
Originally Posted by slopvehicle
let it sit for a day after you prime. after you've done the color and the clearcoat, let it sit a week. yes, a WEEK. don't get impatient and paint Saturday afternoon then build it up Sunday morning-- it needs to harden!
.
.
Wear a mask when you are sanding clearcoat.
The dust is bad for you.
07-07-07, 04:48 PM
#12
No plan.
Thread Starter
Join Date: May 2007
Location: PA
Posts: 2,743
Mentioned: 0 Post(s)
Tagged: 0 Thread(s)
Quoted: 0 Post(s)
Likes: 0
Liked 0 Times
in
0 Posts
Originally Posted by slopvehicle
I'll also add that while Duplicolor is nice, the colors are totally boring. Think about it: bikes are usually more colorful than the average factory-painted car. Duplicolor is made to touch up cars...so it follows that it's boring. Beige with a little sparkle? They've got five different shades. The color of blue you'd expect to see used on a "country" themed interior wall that boasts goose-shaped stencils with little bows tied to their necks? I bet you love that color blue, and I bet your mom owns a minivan in that same damn color.
Painter's Touch (available at many hardware stores, home despot, etc) has decently cool colors and works fine if you're patient.

Although most colors are kind of boring. These metal speck ones are awesome. Two days since spraying and it's rock solid so far.
Dupli-color doesn't scratch but it chips, still. So you can either touch-up the chips or maybe have it sprayed with a clear at an autobody shop. I don't know if they have any clear that's compatible. I have to read more.
So far I've only chipped one area, really small, after hitting a metal office seat with my bike. A little touch-up was fine.
I should also mention that drops are gonna chip off no matter what. So just look at how pretty they are until you're ready to bolt on a wheel.
07-07-07, 07:56 PM
#13
Senior Member
Join Date: Aug 2005
Posts: 1,152
Mentioned: 0 Post(s)
Tagged: 0 Thread(s)
Quoted: 0 Post(s)
Likes: 0
Liked 1 Time
in
1 Post
Duplicolor Mirage is giving me the hots. Been dying to repaint my rusty Mariposa, and thought a silver/green iridescent might do the trick.
It comes as a 3-part kit - base coat, mid coat, and a clear. Not sure if you need primer first, but I'm guessing you do.
It comes as a 3-part kit - base coat, mid coat, and a clear. Not sure if you need primer first, but I'm guessing you do.


